.png?width=200&height=89&name=CC%20%20fiserv.%20(3).png)
Overview
Every customer at your facility has a profile in Customers. From the customer list you can search for someone, open their full profile to view or edit it, or create a brand-new profile. Adding a customer takes a first name, a last name, and either an email or a phone number. Everything else is optional.
Find a customer
- Go to Customers.
- Type a customer ID or membership ID into the Search By Customer/Member Name or Id box.
- Select Search.

The search runs when you select Search, so select it after typing rather than pressing Enter. Select Clear to reset the search and see the full list again.
Open a customer to view or edit
- Find the customer in the list.
- Select the ⋮ menu at the end of their row.
- Select View/Edit.

Their full profile opens in a panel from the right side of the screen, on the General section. The other sections, such as Payment, Membership and Cards, are listed down the left side of the panel.
Add a new customer
- Go to Customers.
- Select ADD CUSTOMER in the top right.

- In the General section, enter the customer's First Name and Last Name, plus an Email or a Phone number.
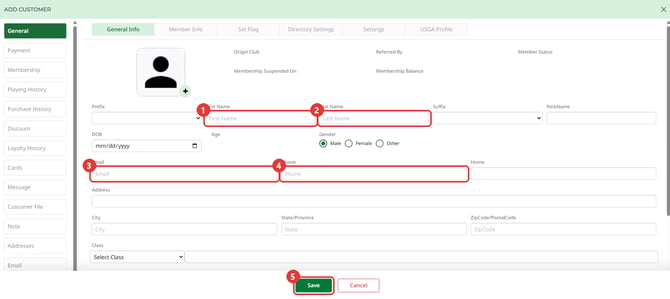
- Select Save.
If a required field is empty when you select Save, you'll see one message at a time: Please Enter First Name, then Please Enter Last Name, then Please Enter Email or Mobile No. Mobile No in that message means the Phone field.
If you enter an Email or a Phone number, it needs to be in a valid format. Address, City, State/Province, ZipCode/PostalCode, DOB, Gender, Prefix, Suffix, NickName, Notes, Class and Tag are all optional.
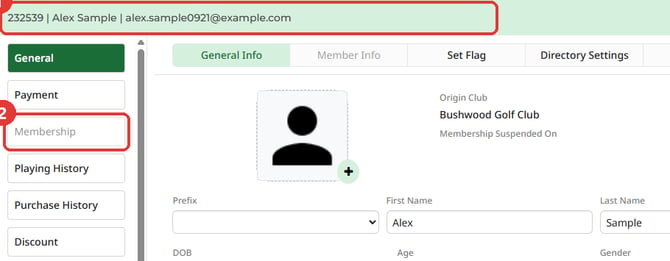
After a successful save, the panel stays open and its header shows the new customer ID and name. The other sections unlock right away, so you can carry on and add payment details, notes or addresses without closing the panel. Membership stays locked until the customer is signed up as a member and given a membership class.
Delete a customer
- Find the customer in the All Customers list.
- Select the ⋮ menu at the end of their row.
- Select Delete.
- Select Yes to confirm.
Delete doesn't permanently erase the customer. It archives them: the customer leaves the All Customers list and appears under the Archived Customers tab.
Common Questions
Which sections can I use right after creating a customer?
All of them except Membership, and the Member Info part of General, which unlock once the customer is signed up as a member and given a membership class. As soon as the save succeeds, sections such as Payment, Cards, Note and Addresses unlock in the same panel.
Can I search by membership ID?
Yes. Type the membership ID into the search box and select Search. The first few characters of the ID work too.
How do I open a customer's profile from the list?
Select the ⋮ menu at the end of their row, then View/Edit.
Do I need to fill in an address to save a new customer?
No. Only First Name, Last Name, and either an Email or a Phone number are required. Everything else is optional.
Does Delete permanently remove the customer?
No. It archives them. The customer moves to the Archived Customers tab instead of being erased.