.png?width=200&height=89&name=CC%20%20fiserv.%20(3).png)
When you have a stack of member check payments to enter, you no longer have to ring them up one at a time through the Register. The Member Check Payments Batch Processing screen gives you a single grid where each row is one member's payment. You add a row for every payment, fill in the details, and save the whole batch at once. This feature lives in the Browser version of Club Caddie.
Before you start
This feature is in the Browser version only. It is not available in Desktop.
You also need the Membership Payments permission (found under Register in Manage Roles). If you don't see the Member Check Payments Batch Processing button on the Membership Tools page, your role doesn't have that permission — ask an administrator to add it.
How to get there
Step 1: Log in to Club Caddie in your browser.
Step 2: Go to Customers in the left sidebar.
Step 3: Open Members, then click the Membership Tools sub-tab. It is the fifth tab in the strip (Member List, Purchase History, Payment History, Payment Management, Membership Tools).
Step 4: On the Membership Tools page, click the Member Check Payments Batch Processing button. It is one of the buttons on that page, alongside Mass Membership Adjustment and Multiple Membership Adjustment.
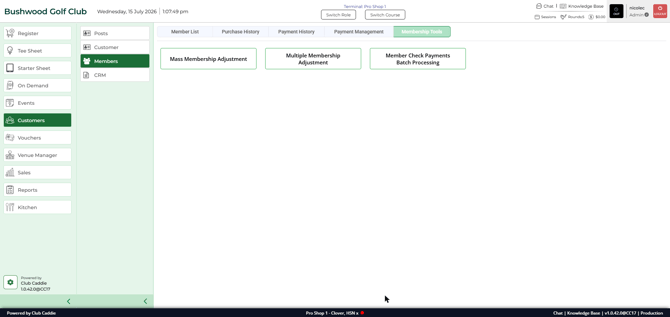
Enter a batch of check payments
Step 1: Click the Member Check Payments Batch Processing button to open the screen.
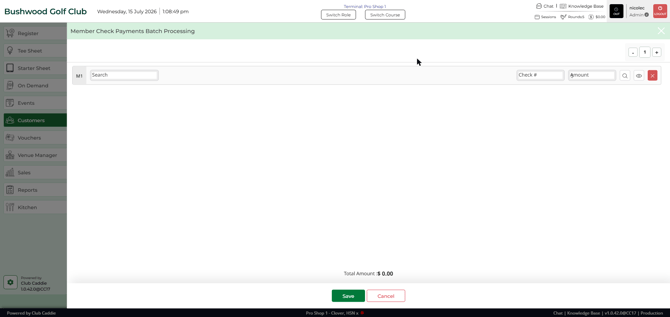
Step 1: Use the + / − controls at the top right to set how many payment rows you need. Each row is one member's payment.
Step 2: For each row, search for the customer in the Search field. When you select the right member, their Name, Member ID, Email, and Phone fill in automatically.
Step 3: Enter the Check # for that payment.
Step 4: Enter the $ Amount.
Step 5: Repeat for every payment. The Total Amount at the bottom adds up as you go, so you can check it against your deposit slip before saving.
Step 6: Click Save to post all the payments as a single batch. Click Cancel if you need to throw out the entries and start over.
Watch the Total Amount as you go — it's the fastest way to confirm your batch matches the checks in front of you before you save. Use the + / − controls to add exactly one row per payment; don't try to fit more than one payment on a row.
Common Questions
Where do these payments show up after I save?
They post to each member's account.
Do I need a special permission to use this screen?
Yes. You need the Membership Payments permission, which lives under Register in Manage Roles. Without it, the Member Check Payments Batch Processing button does not appear on the Membership Tools page.
Is there a template to upload instead of entering rows one by one?
No. Payments are entered directly in the on-screen grid — there is no template to download or file to upload.