Article Contents:
This Clover Mini User's Guide covers the device's features, setup process, and troubleshooting. It details the device's secure payment capabilities, network requirements, and setup steps, including unboxing, connecting to a network, and registering with CardPointe Integrated Payments.
The guide also explains the two modes of operation (Merchant Mode and Customer Mode), how to accept payments, access the CardPointe Admin Panel, and configure settings. The support section addresses common issues like registration problems, network connectivity, receipt printer issues, locking Customer Mode, and reinitializing a device after a factory reset.
Overview
The CardPointe Integrated Terminal Clover Mini provides a sleek and secure next-generation payment experience for your customers.
Date Updated: 10/18/2022
Our Bolt family of integrated solutions is becoming CardPointe Integrated Payments.
Over the coming weeks, your terminals will receive an update with minor changes, including an updated default theme and branding for terminals that are not configured with custom branding.
Terminals will update automatically during the nightly reboot window; therefore, we ask that you leave your terminals powered on and connected to your network overnight. Once your terminal is updated, you may notice the following changes:
- If you are using the default device wallpaper and theme, the Bolt wallpaper and logo will change to CardPointe Integrated Terminal.
- The Bolted and Unbolted statuses will change to Connected and Disconnected, respectively.
Additionally, for Ingenico Lane terminals, the PIN entry prompt for EMV PIN Debit cards will now displays the following additional information:
- The Application Label, which describes the EMV application name read from the card (for example, "US Debit").
- Instructions for bypassing PIN entry:
"Press the Red X to Cancel or the Green Circle to Bypass"
Device Features and Benefits
- Minimize your scope of PCI compliance with point-to-point encryption. Encrypted data traverses the Wi-Fi network using a secured connection (HTTPS over TLS 1.2).
- Stay connected with support for Ethernet, Wi-Fi, and LTE networks.
- Accept all card-present payment methods, including EMV (chip), magnetic-stripe, and NFC (contactless).
- Accept card-not-present payments by manually entering card data.
- Provide receipts using the convenient built-in printer.
- Easily add devices to your existing integrations. See the CardPointe Integrated Terminal Developer Guide for Clover Terminals for more information.
- Enhance the customer experience with Clover accessories, like the Clover Mini Swivel stand.
The Clover Mini has a backup battery that provides approximately 20 minutes of power in the event of a power outage. Note that the built-in printer is disabled while the device is powered by the backup battery.
Currently, CardPointe Integrated Terminal does not support tethered Clover Mini configurations.
Network Requirements
The Clover Mini can connect to your network using both Ethernet and Wi-Fi. It is recommended that you connect the device to an Ethernet network to ensure a fast, stable connection.
Consider the following when configuring your network:
- The terminal device does not support the use of a TLS proxy for internet access; the device must have a direct connection from your network to the internet.
- Configure a DHCP IP address range to connect terminal devices to a dedicated subnet. Alternatively, use static IP addresses reserved for your devices.
- Configure a new WPA Wi-Fi (with password requirement) network for the new device subnet. Optionally, restrict access to this network to specific MAC addresses or IP addresses. For extended security, you can restrict the services or ports that are allowed to communicate over the network.
The following topics provide requirements and instructions for setting up your device.
Before you begin, ensure that you have your CoPilot equipment order email (titled "Your CardPointe Terminal Order Has Shipped!") handy. You'll need the Registration Code included in the email to register the device.
Do the following to get started with your new device:
Unbox the Clover Mini
The Clover Mini includes:
- Clover Mini Quick-Start Guide
- Device hub
- Power cable
- Receipt paper
- Screwdriver
- Preinstalled SIM card (LTE models)
Set up the Clover Mini
After you unbox your Clover Mini, do the following to set up and connect the device:
- Connect the power cable to the device hub.
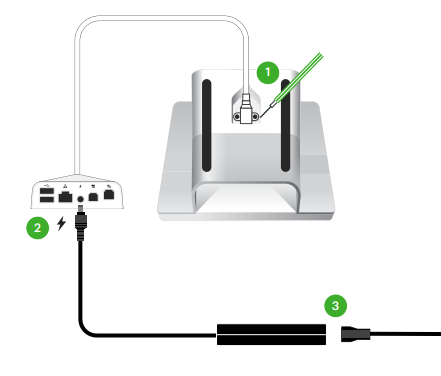
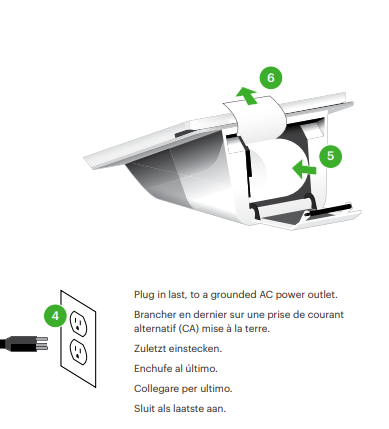
The Clover Mini powers on and displays the Welcome screen.
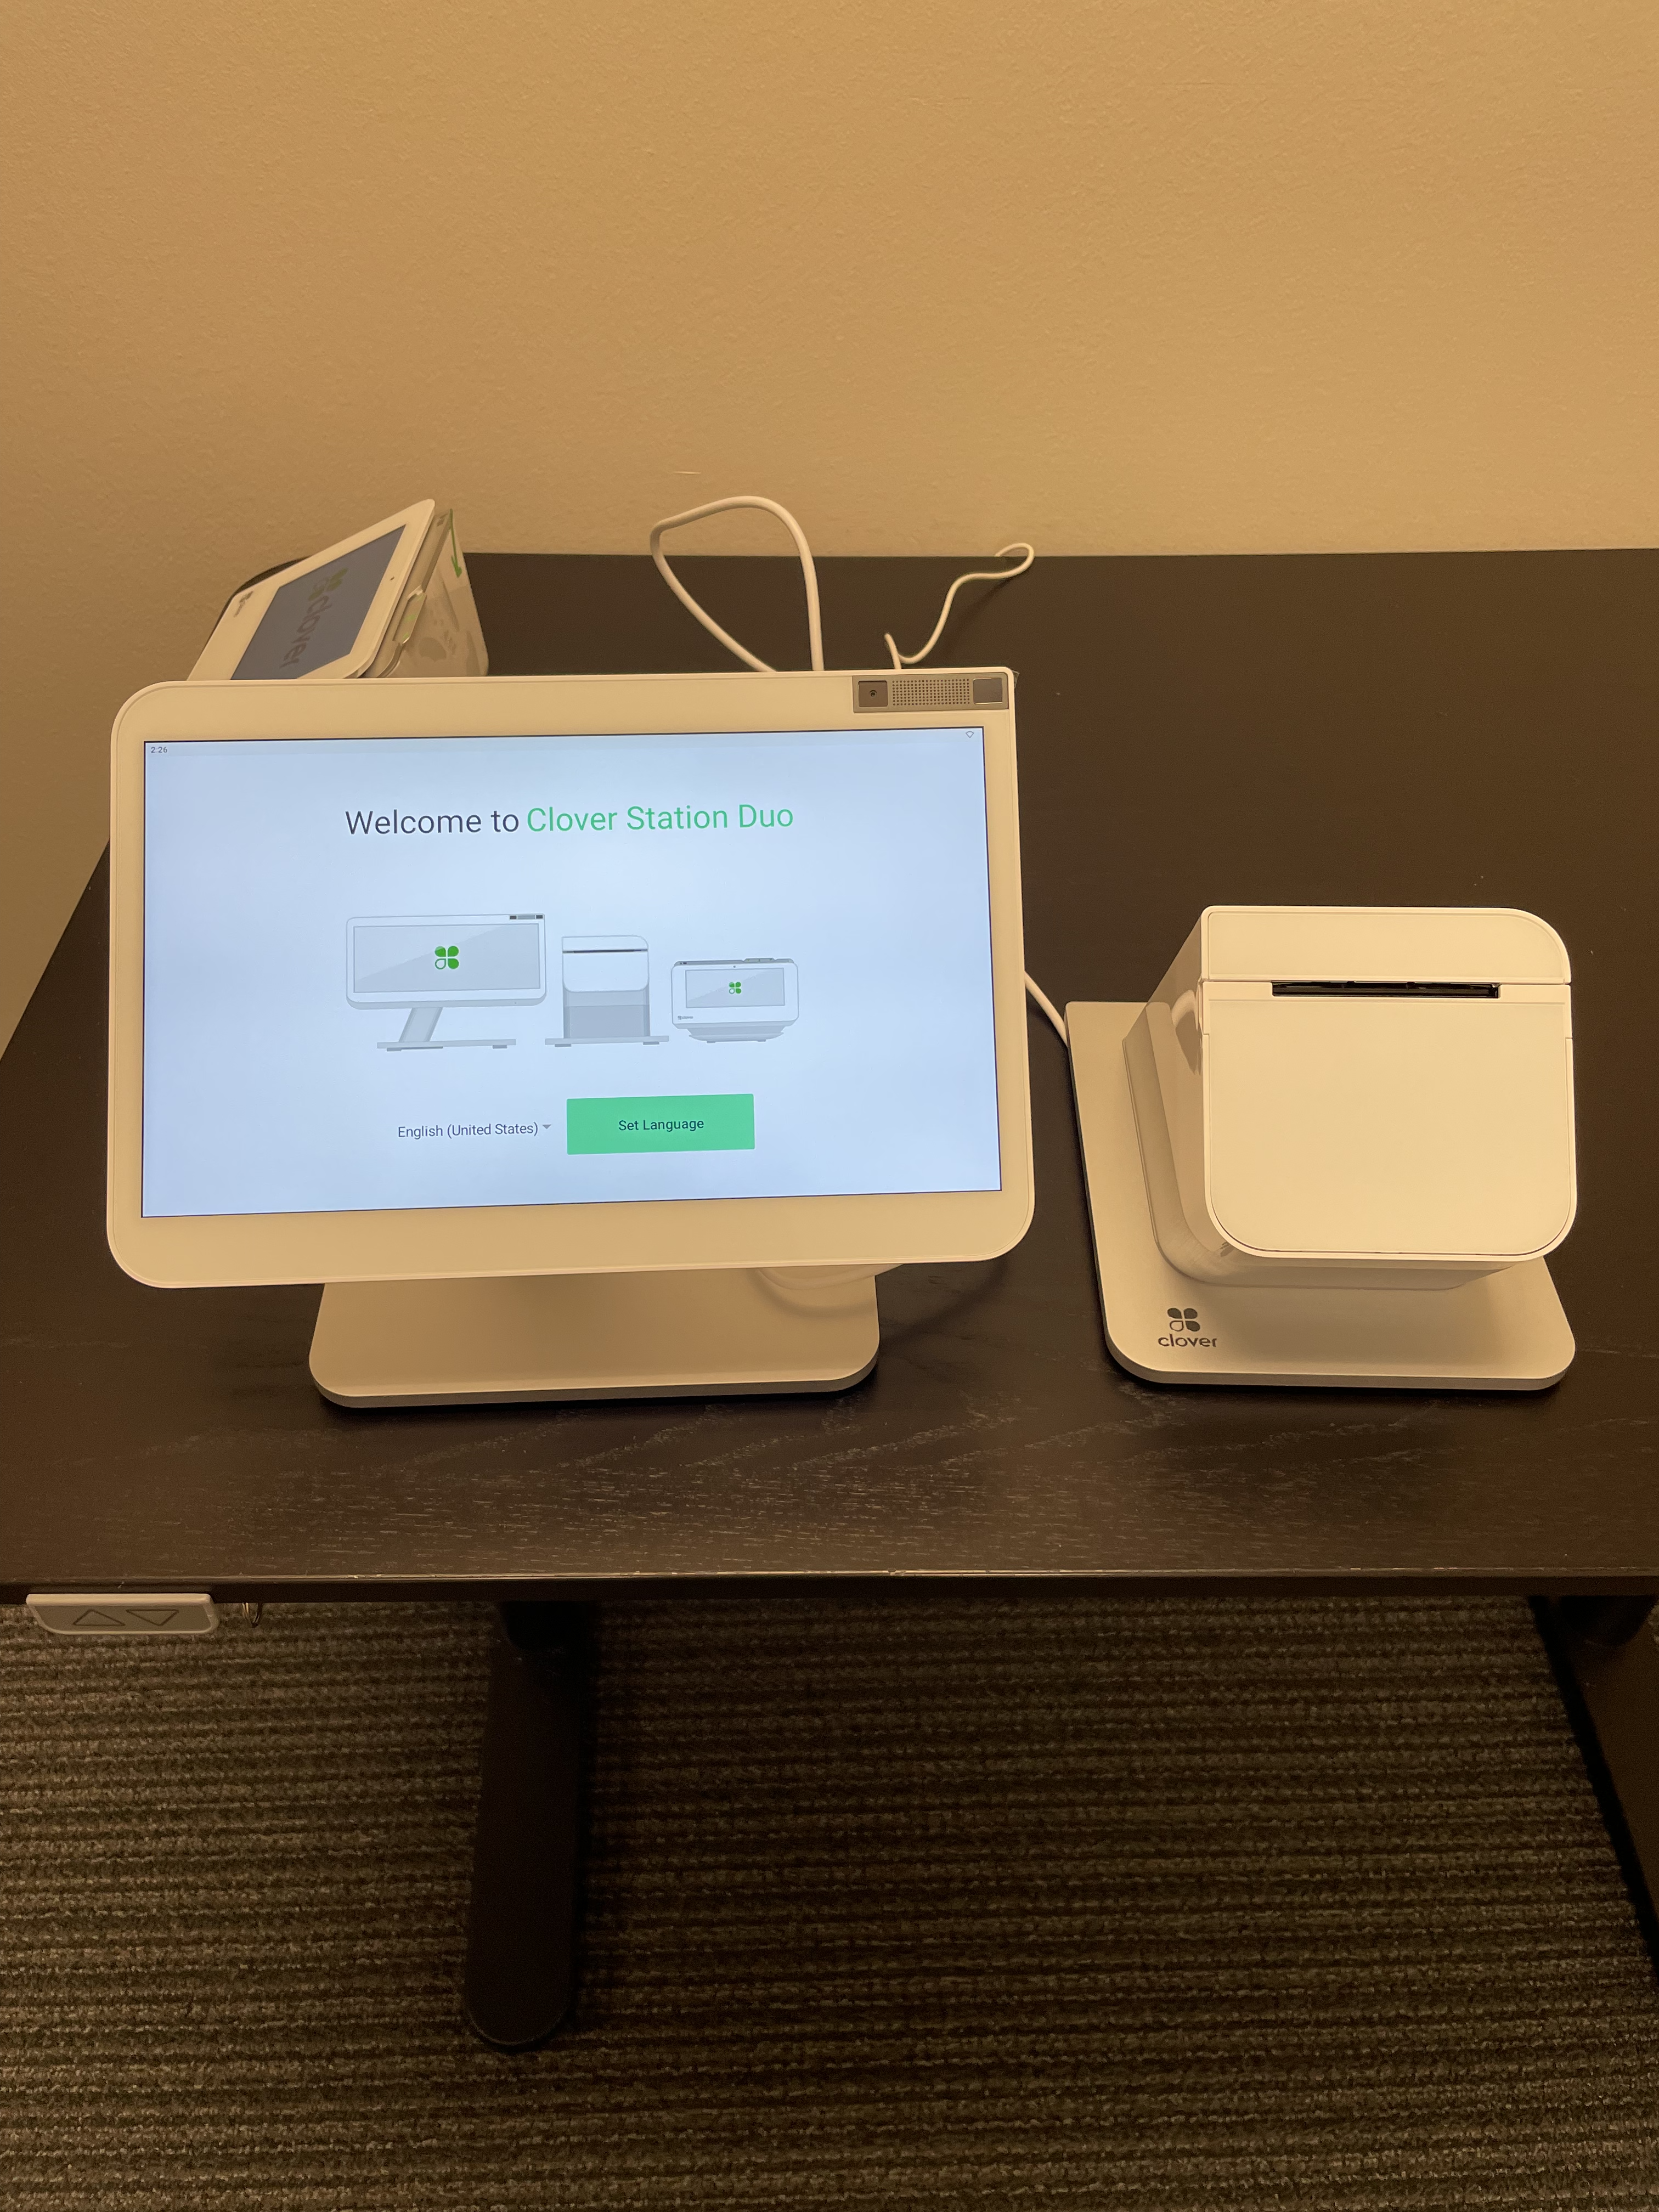
- Select a language and press Pick Language.
- On the Connect to network screen, do the following to configure the device's network connection:
- To connect to a Wi-Fi network, tap Configure next to the Wi-Fi option, and select your network.
- To connect to an Ethernet network (recommended), connect an Ethernet cable to the device hub. The device should automatically connect to your network.
- To connect to an LTE network, tap Configure next to Mobile (SIM card).
The device displays Successfully Connected to Server once the network configuration is complete.
- Click Next to proceed.
The device begins to download and install the CardPointe App and other required components.
Once complete, the CardPointe App launches and displays the Terminal Registration screen.
- Continue to Registering the Clover Mini for more information.
Register the Clover Mini
Once the Clover Mini setup process is complete, you must register the device with CardPointe Integrated Payments to get started.
The first time the CardPointe Application launches, it displays the Terminal Registration screen and prompts you to enter the registration code that you received to register the terminal. Before you begin, ensure that you have your order confirmation email and registration code handy.
Do the following to register the device:
- On the Terminal Registration screen, tap the empty field to open the keyboard.
- Enter the 8-digit Order ID provided in your welcome email, then tap Continue.
The CardPointe Application authenticates and registers the Clover Mini with the CardPointe Integrated Payments service.
- On the Registration Complete screen, tap Continue to complete the device registration.
- The CardPointe Application displays the Welcome screen. See Using the Clover Mini CardPointe Application to get started.
Note: If you encounter an error, tap the "Terminal registration failed" banner at the top of the display for troubleshooting information. Record the error codes in the event that you need to contact CardPointe support.
Using Your Device
The CardPointe application was installed during the device set up and activation process.
The CardPointe app supports two modes of operation:
- Merchant Mode - Merchant Mode is the merchant-facing interface. In Merchant Mode, you can access the CardPointe Admin Panel to manage CardPointe application and terminal settings. You can also access the Android device settings.
- Customer Mode - Customer Mode is the customer-facing interface. In Customer Mode, the merchant or customer can use the device to submit a payment.
To switch from Customer Mode to Merchant Mode, tap the 4 corners of the touch screen simultaneously.
Launching the CardPointe App
From the CardPointe Launcher, tap the CardPointe icon to launch the CardPointe app to begin accepting payments. Additionally, you can launch the Settings app to modify the Android device settings.
The CardPointe app initially launches in Merchant Mode and displays the Welcome screen. If the Clover Mini is connected and is ready to begin accepting payments, the status displays Connected. If the status displays Disconnected, the device is unable to communicate with the CardPointe Integrated Terminal service. Access the CardPointe Admin Panel to troubleshoot the network connection.
To begin accepting payments, tap the Customer Mode button. To access the CardPointe Admin Panel to view or modify CardPointe application settings, tap the Admin Panel button.
Accepting Payments
To accept payments, the CardPointe Integrated Terminal Clover Mini must be connected to the CardPointe Integrated Terminal service (Connected), and must be in Customer mode. Once the CardPointe application is in Customer mode, your POS software sends and receives data using the CardPointe Integrated Terminal API.
The Clover Mini must be in Customer mode to accept payments. The device cannot communicate with your POS software when Merchant mode is enabled.
It is strongly recommended that the device remains in Customer mode during normal operation. You can enable the Lock Customer Mode option to launch the CardPointe application in Customer mode. See Using the CardPointe application in Merchant Mode for more information.
Using the CardPointe Integrated Terminal Application in Merchant Mode
The CardPointe application initially launches in Merchant Mode. Merchant Mode provides access to the CardPointe Admin Panel, a merchant-facing interface that you use to configure and troubleshoot the CardPointe application.
To switch to Merchant Mode from Customer Mode, tap all 4 corners of the touch screen simultaneously.
In Merchant Mode, you can access the CardPointe Admin Panel.
The CardPointe Admin Panel provides access to the following information:
| Label | Description |
|---|
| Status | Displays Connected if the device is successfully connected and authenticated to the CardPointe application service, or Disconnected if the device is not connected to CardPointe application service. |
| HSN | Displays the terminal hardware serial number (HSN). If you need to contact CardPointe Support, you will need to provide the HSN. |
| Lock Customer Mode | Enabling this setting forces the terminal to bypass the unlock screen and automatically start in Customer Mode. |
| Contact Support | Opens a browser window to the CardPointe Support Site. |
| CardPointe Properties | Displays the CardPointe Integrated Terminal properties.
This menu provides useful information for troubleshooting CardPointe Integrated Terminal Application and device issues. |
| Internet Connection | Displays the internet connection status and configuration.
Select Advanced Configuration to modify the network settings and other Android device settings. |
| Application Properties | Displays the CardPointe Integrated Terminal Application version as well as the Payment Card Industry (PCI) PIN Transaction Security (PTS) validation level. |
Support
The following topics provide support and troubleshooting information for some common issues that you might encounter.
To order equipment or for additional assistance, contact CardPointe Support:
ce Registration Issues
If you encounter an issue registering the device, ensure that your device is connected to the network. For network troubleshooting information, see Network Connectivity Issues.
If you receive one of the following error messages when attempting to register the device, do the following to resolve the issue:
- Order not valid for terminal
Ensure that you entered the correct registration code when you attempted to register the device. Check your Welcome Email to verify your registration code. If you no longer have access to the Welcome Email, contact CardPointe Support for help recovering your registration code.
- Terminal already registered
This error can occur when the device was previously registered, but has since been reset to the factory configuration, and you are attempting to re-register the device. In this case, the device must be reinitialized.
Do the following:- On the Registration Failed modal, tap Retry to return to the Terminal Registration screen.
- On the Terminal Registration screen, tap the Go to Reinit message at the bottom of the screen to access the Terminal Reinitialization screen.
- Contact CardPointe Support to obtain a reinitialization key.
- On the Terminal Reinitialization screen, enter the reinitialization key.
If you receive any other error messages, contact CardPointe Support for assistance.
Network Connectivity Issues
If the device is experiencing network connectivity issues, do the following to troubleshoot the network connection:
- If the CardPointe App is in Customer Mode, press all four corners of the touch screen to switch to Merchant Mode.
- In Merchant Mode, tap the Admin Panel button on the Welcome screen.
- On the Admin Panel, tap Internet Connection to view the connection status and properties.
- To modify or reconfigure the network settings, tap Advanced Configuration to access the Android device network settings.
Receipt Printer Issues
If the receipt printer is not functioning, do the following to troubleshoot the issue:
- Verify that the device is not out of paper, and that the paper is correctly installed.
- Verify that the device is connected to the hub, and that the hub is connected to a power source. The printer is disabled when the device is not connected to a power source and is running in low-power mode.
Locking Customer Mode
When the Customer Mode Lock option is enabled, the CardPointe App always launches in Customer Mode. It is recommended that you enable Customer Mode Lock to ensure that the device is always in Customer Mode and connected to your POS application. To enable the Customer Mode Lock do the following:
- If the CardPointe App is in Customer Mode, press all four corners of the touch screen to switch to Merchant Mode.
- In Merchant Mode, tap the Admin Panel button on the Welcome screen.
- On the Admin Panel, tap the Lock Customer Mode toggle to enable or disable the option.
Switching User Modes
The CardPointe App has two modes of operation, Customer Mode and Merchant Mode. to switch between the modes, do the following:
- To switch from Customer Mode to Merchant Mode, tap all four corners of the touch screen simultaneously.
- To switch from merchant Mode to Customer Mode, tap the Customer Mode button on the Welcome screen.
Reinitializing a Device after Factory Reset
If you perform a factory reset on the Clover Mini, you will be prompted to register the device before you can launch the CardPointe App.
In this case, the device must be reinitialized.
Do the following:
- On the Terminal Registration screen, tap the Go to Reinit message at the bottom of the screen to access the Terminal Reinitialization screen.
- Contact CardPointe Support to obtain a reinitialization key.
- On the Terminal Reinitialization screen, enter the reinitialization key.