Guest Rates
Article Contents:
This article contains a step-by-step guide on how to create specific rates for Guests.
This article contains a step-by-step guide on how to create specific rates for Guests.
Example:
Jason is a Platinum member and brings three non-members to play in his foursome, those non-members could receive a discounted guest rate, lower than the regular rack rate. That’s where these guest rates come into play. You can assign multiple membership classes to one guest rate. So, if you have 15 different types of memberships, instead of creating 15 separate guest rates, you can assign all memberships to one rate.
Step-by-Step:
Step-by-Step:
Step 1: Navigate to Settings, then click on Class Rate Management on the left-hand-side.
Step 2: Select the Guest Rates tab, then click on Add. Here in the pop-up window, enter the correct information for the guest rate. When all the information is entered, click Next.
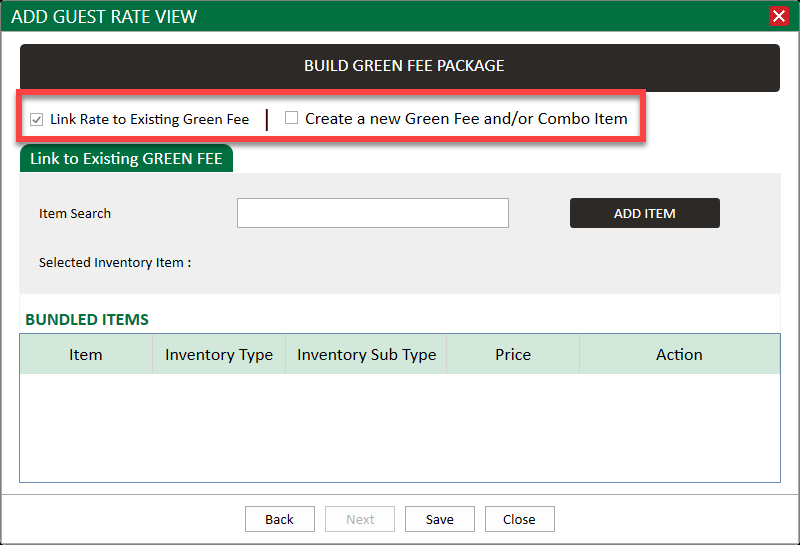
Step 3: On the next page, you will see two options on the top to select:
Link Rate to Existing Green Fee / Cart Fee Combo Item
Create a new Green Fee and/or Combo Item.
Please see descriptions below for what option is best for you.
Link Rate to Existing Green Fee / Cart Fee Item:
This option is the more common as you are creating a new combo item (greens fee and cart). You are creating your new rate option, but then after you select this option, you will have the choice to either.

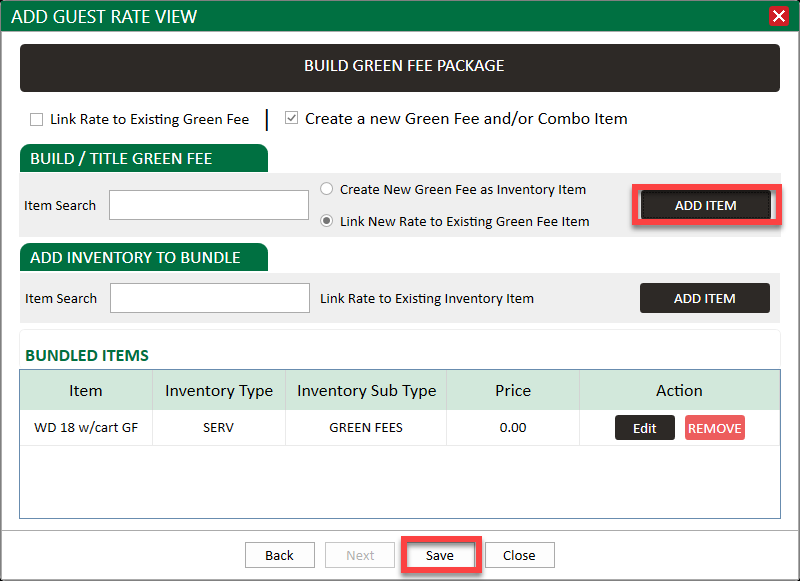
Create New Green Fee as Inventory Item or Link New Rate to Existing Green Fee Item (most common). With either choice you are creating a new combo in your inventory, but you have the option to either tie the greens fee part of the combo to another greens fee or create an entire new greens fee.
Create New Green Fee as Inventory Item or Link New Rate to Existing Green Fee Item (most common). With either choice you are creating a new combo in your inventory, but you have the option to either tie the greens fee part of the combo to another greens fee or create an entire new greens fee.
Step 4:
If the rate is Walking, then click Save. If this rate will include a cart, add a cart fee under Add Cart to Bundle. To do so, click in the box and start typing for ex. "cart". Your cart rates will then populate and you can select which cart fee you wish to include, then click Add Item. The cart fee will then drop down below to be bundled with the greens fee. Then, click Save to add this rate.

Step 5: Find this rate in your list in Class Rate Management.
Step 5: Find this rate in your list in Class Rate Management.
Step 6: To add the Guest Rate to a class or multiple classes, first click Class Type. Then in the pop-up window, select which classes you would like the rate to be applied to.
Step 7: To include this rate as an option for your third party seller, click on Partner. In the pop-up window you will be able to check which distributer you want to include.

Guest rates won’t appear online or in the POS unless the user is part of the relevant membership class.
Scenario:
You run a facility with a Platinum membership tier, and Jason, one of your Platinum members, brings three guests. With the guest rate feature, instead of charging his guests the full rack rate, you could assign them a discounted guest rate, reflecting a benefit of being associated with a Platinum member. This also simplifies management, as you can set one guest rate to cover all membership types, saving you from creating separate rates for each.
Related Articles
Settings > Activity Center - Blended Rates for Activity Bookings
Article Content: This article provides a guide on how to set blended rates for your activity booking. This Strategy essentially eliminates the need to set up individual Rates for different Durations other than 60 minutes - because everything is ...Class Rate Management - Setting up Holiday Tee Time Rates
Article Contents: This article contains step-by-step instructions on setting up holiday tee time rates, which will override existing rates for the specified day, making the holiday rate the only available rate other than other holiday rates created ...Settings - Tying Rates to Customer Classes.
Article Contents: This portion summarizes how to tie rates to customers. Step-By-Step: Step 1: Navigate to the settings panel by clicking on the Gear Wheel icon on the top right-hand corner of the screen. Step 2: Click on Class Management in the ...Setting up Holiday Tee Time Rates
Article contents: This article contains step-by-step instructions on how to establish holiday tee time rates. These rates will override regular rates for the specified holiday, ensuring that the holiday rate is the primary rack rate for that day, ...How to Add Rack Rates
Article Contents: This article shows how to Add rack rates to tee sheet Please see the attached Guides for a step-by-step walkthrough on how to create a Rate (PDF and Video) Step-By-Step: Step 1: Click on "Settings". Step 2: Click on "Rack Rate ...