Inventory Center - Audit Inventory
Article Contents:
This article contains step-by-step instructions on how to maintain accurate inventory levels and how to evaluate item costs according to stock.
Video:
Step-by-Step:
Step 1: Click the Gear Wheel icon from the window's top right corner. Select the Inventory Center from the left-hand menu.
Step 2: From the Inventory Center click the Audit Iventory tab. The system will open four tabs: Counted, Not Counted, Reconcile, and Gain/Loss for the currently selected inventory audit.
Step 3: First select New Inventory Count and define a name for the inventory audit that is easy to recognize and refer back to. Click Save once the name has been defined.
Step 4: On the left side panel, select the newly created inventory audit. Under the Counted tab, it will display item details for the currently selected department and sub-department. The Counted column is editable allowing for entering the quantity for which has been counted. Once the respective inventory quantities have been input, click Save All.
Step 5: The Not Counted tab will filter the inventory list by all items that have not yet received an inventory count.
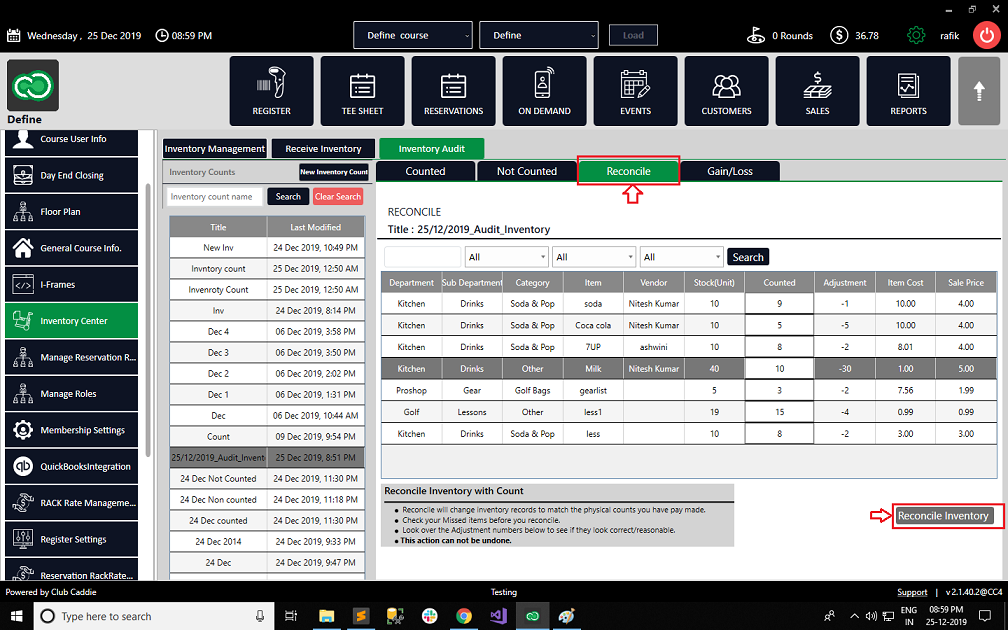
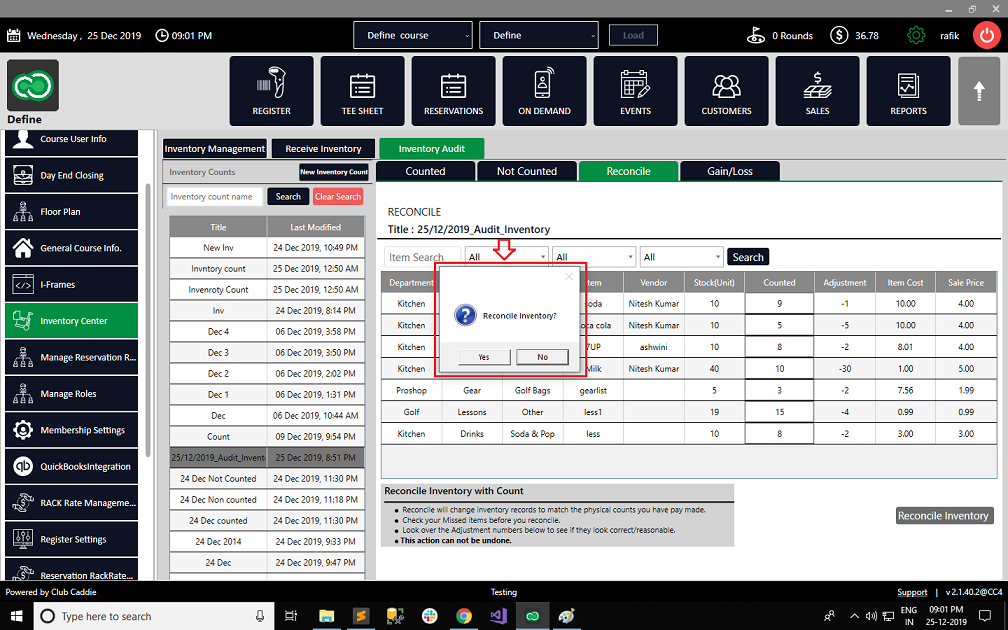
Step 6: Next, click on the Reconcile tab. Under this tab is a list of items that have been adjusted. These adjusted items shown are ready to be reconciled. Before clicking Reconcile Inventory, look over the adjusted numbers to verify that they are correct. Once confirmed, reconciling will change the inventory record to match the physical counts. To finalize the count, click Reconcile Inventory.
Step 7: Lastly, click the Gain/Loss tab. The Gain/Loss window is a summarization of the reconciled items and the adjustments that have been made to the cost of the remaining items in stock.
Step 7: Lastly, click the Gain/Loss tab. The Gain/Loss window is a summarization of the reconciled items and the adjustments that have been made to the cost of the remaining items in stock.
Related Articles
Bluetooth Inventory Scanning
Article Contents: This feature allows users to audit their inventory using a wireless barcode scanner efficiently. Step by Step: Step 1: Navigate to Settings, then click on Inventory Center from the left-hand-side menu. Step 2: Click on the Audit ...Inventory Center-Receive Inventory
Article Contents: This article contains step-by-step instructions on how to receive inventory and how to create a vendor. Video: Inventory Center - Receiving and Transferring Step By Step: Step 1: Click the Gear wheel icon from the top right corner ...Inventory Center - Create and Update combo Inventory.
Article Contents: This article gives step-by-step instructions on creating and updating combo inventory in your system. Step-By-Step: Step 1: Click on "Settings" then "Inventory Center". Step 2: To add a new item to your inventory, you need to click ...Inventory Center- How to Add / Manage Items.
Article Contents: This article contains step-by-step instructions on how to add/manage items through the Inventory Center. Step By Step: Step 1: Click the "Settings" gear wheel icon from the top right corner of the window. Select "Inventory Center" ...Inventory Center - Bulk Export / Import.
Article Contents: This article gives step-by-step instructions on how to Import/Export Bulk Inventory. Step-By-Step: Step 1: Click on the "Settings" button in the top-right corner of the screen. Step 2: Click on the "Inventory Centre" option in the ...