Membership - Online Membership Sales & Application Creation
Article Contents:
Our latest update revolves around the introduction of new settings under Class Management, aimed at improving the online sale and signup experience for memberships. These settings include the creation of custom sale strategies, the addition of terms and conditions specific to each class, the implementation of a cancellation policy, the proration of memberships, and the establishment of maximum assignments for memberships.
Step by Step
Step 1: Sales Strategy  Navigate to Settings → Class Management → Action dropdown and select the "Sale Strategy" option.

Navigate to Settings → Class Management → Action dropdown and select the "Sale Strategy" option.
This allows for creating various sale options for classes, each with distinct names, dues amounts, and sub-member limits.
Within this section, users have the flexibility to create multiple strategies per class to cater to different prospect preferences.
The base price of the class is visible here, and by accessing the sales strategy section, the link at the top will correspond to this base price.
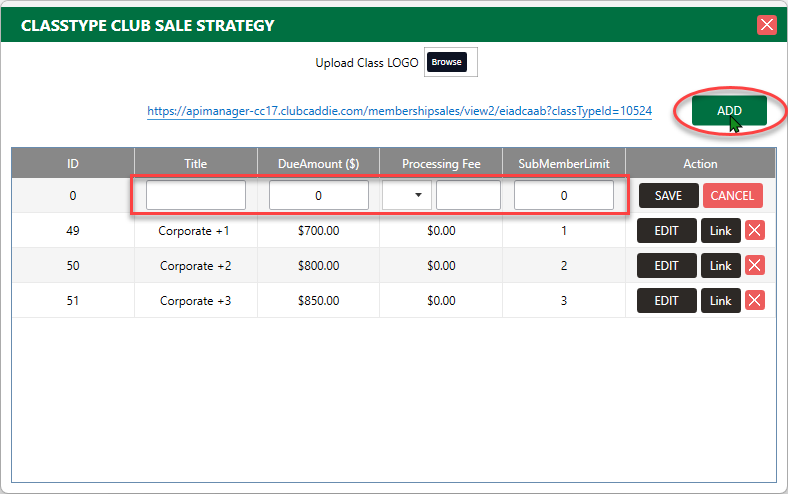
However, users can expand on this by adding additional sub-members, such as a shared corporate membership or a prime membership, by clicking ADD and entering the Title, Due Amount, Processing Fee (if applicable), and Sub Member Limit and click Save.

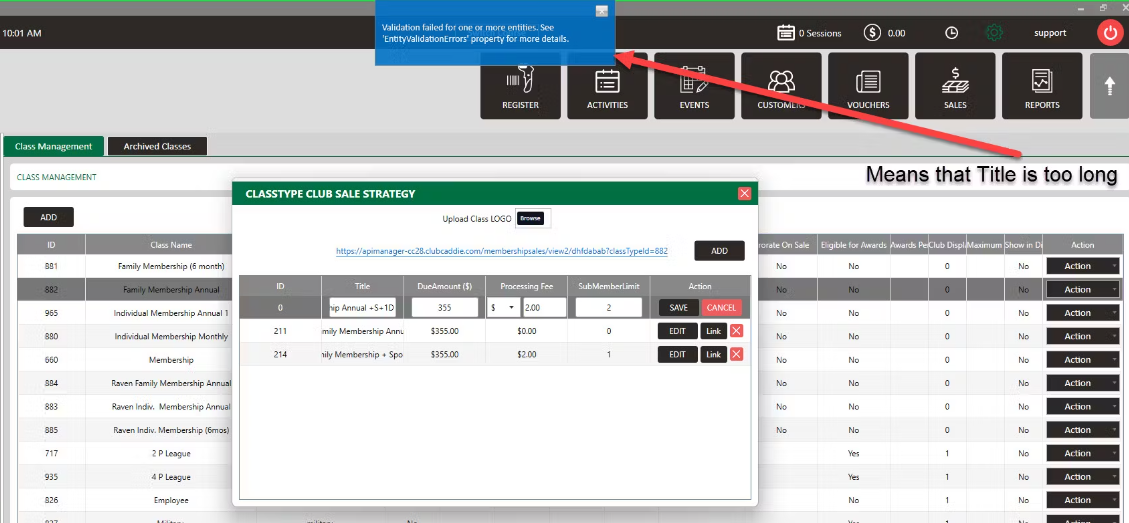
 If you receive the error message of "EntityValidationErrors", that means the Title is too long.


If you receive the error message of "EntityValidationErrors", that means the Title is too long.
 It's important to note that an amount must be entered in the processing field to save the strategy, even if it is "0".

It's important to note that an amount must be entered in the processing field to save the strategy, even if it is "0".
Each strategy configured will generate a unique web link, allowing potential buyers to review the specific details and pricing of the offer before making an online purchase.
Step 2: Terms and Conditions: Under the same navigation path, find the "Terms and Conditions" option to input custom text applicable only to the selected class.
 Navigate to Settings → Class Management → Action dropdown and select the "Terms and Conditions" option.
Once the terms and conditions are entered, hit Save.
 This text will be presented during the online signup process, and if omitted, the terms and conditions section will not appear on the signup link.
 This text will be presented during the online signup process, and if omitted, the terms and conditions section will not appear on the signup link.
Step 3: Cancellation Policy: Similarly, the "Cancellation Policy" option allows for the addition of class-specific cancellation terms.
 Navigate to Settings → Class Management → Action dropdown and select the "Cancellation Policy" option.
Once the cancellation policy is entered, hit Save.
Step 4: Prorate on Sale: The "Prorate on Sale" field introduces the option to prorate memberships at the point of sale online and auto-calculate the prorated amount within a billing period. If this is enabled, the Membership Class that is assigned/purchased will be prorated when it is assigned to a Member, through the online sale.
 Navigate to: Settings
→ Class Management → a new field for “Prorate on Sale”
Navigate to: Settings
→ Class Management → a new field for “Prorate on Sale”- Toggle this option ON to allow this feature.
Step 5: Maximum Assignments: Finally, the "Maximum Assignments" field limits the number of active memberships to a predefined quantity, visible to customers on the online sale link. Once the limit is reached, the class will no longer be available for sale or assignment.
 Navigate to Settings → Class Management → Action dropdown and select the "Additional Settings" option.
- Enter the amount in the Maximum Assignments and click Save.

If your facility would to receive notifications when a membership sale occurs, you should need to navigate to the Communication Center and add this as a club email:

If you are looking to edit the Sales Strategy for all existing members, you will need to check this box when editing the price for the class:
Related Articles
Class Management - Minimum Group Size for Online Bookings
Article Contents: This is a step-by-step guide on how to set a minimum for group size for online bookings. Example: If you have a class called Platinum and would like to allow them to book as a single, you can enter 1. However, if you have a silver ...Setting > Register Settings - Selling gifts cards online
Article Contents: This article contains step-by-step instructions on how to create custom voucher types and map the vouchers to your chart of accounts. Step-by-step: Step 1: Click on Settings (gear wheel icon) in the top-right corner of the screen. ...Understanding Sales Tax in Club Caddie
Article Contents: This article reviews the basics of sales tax and how it impacts your facility. Learn how sales tax is calculated in Club Caddie and why it is calculated that way. IMPORTANT: Sales tax on this report is an estimate based on how you ...Settings – Class Management
Article Contents: This is a step-by-step guide on how to create a new class or edit an existing class. Step-By-Step: Step 1: Click on the Gear Wheel icon on the top-right corner of the screen. Then click on Class Management from the left-side menu. ...Membership Billing & Invoices: Customers Minimum Spending Requirements by Department
Article contents:- This article summarizes the minimum spend rules by class or customer for any department's spending. Step By Step:- Note:- You can set a minimum spend rule across an entire class or alternatively set up a customer-specific spend ...