Register: Seat Orders
Article Content:
The steps below demonstrate how you can allow orders to be assigned to specific seats within a tab. When opening a new tab, users can specify the number of seats and assign orders to seats before sending them to the kitchen. Orders can be moved between seats before splitting checks.
Step by Step Guide:
Step 1: Navigate to the Register and start a new tab.

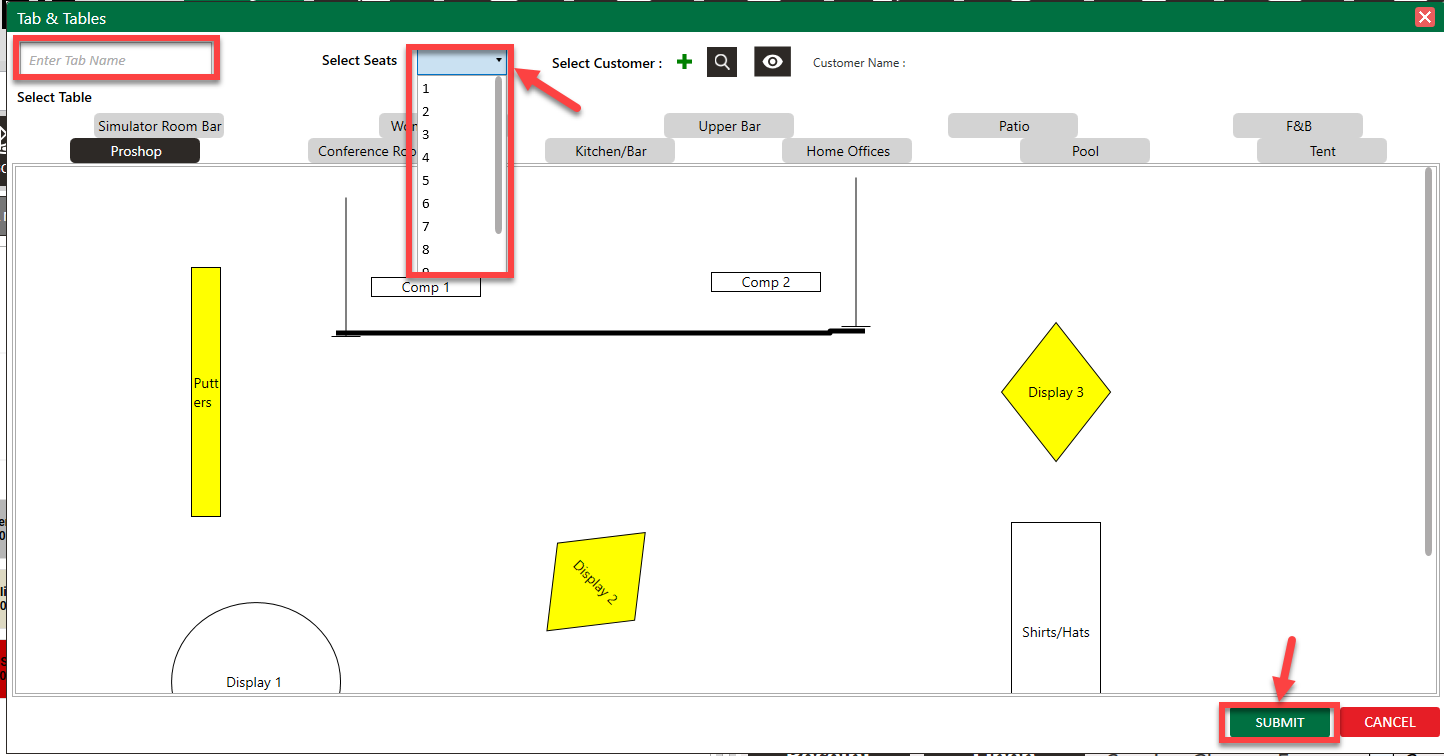
Step 2: Assign the table and then select the number of seats for that table.
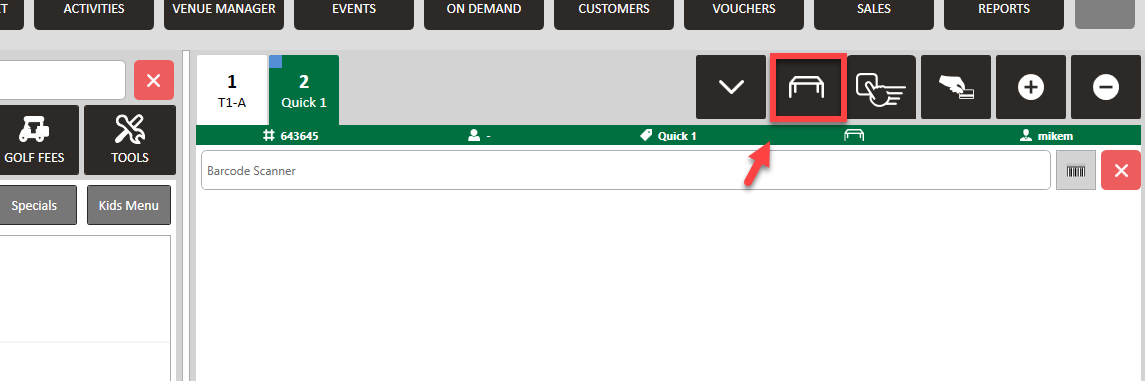
Step 3: You can then either (A) select the seat in the register and then add items, or you can (B) add all items and then you can edit each item to an assigned seat.
(A) Select the seat number, and then add the items. For ex. select seat 1, and add the nachos. Then select seat 2, then add the Jalapeno Dip.
Step 2: Assign the table and then select the number of seats for that table.
Step 3: You can then either (A) select the seat in the register and then add items, or you can (B) add all items and then you can edit each item to an assigned seat.
(A) Select the seat number, and then add the items. For ex. select seat 1, and add the nachos. Then select seat 2, then add the Jalapeno Dip.
(B) All items are added without assigning a seat, but now you can go ahead and assign each one to a seat.
 Properly name tables (e.g., "T1" instead of just "Table 1") to avoid confusion in reports.
Step 4: To send to the kitchen, you would click on Send like you normally would, but then in the pop-up, you will have the option to either check which items you would like to send, or you can click Select All to send all items to the Kitchen. Please note that the seat assignments will be on the receipt to the kitchen.
Step 5: For individual checks, click on Split to create a tab for each seat.
Any items that are not assigned a seat will be combined into one tab. Also, by right-clicking on the item, you will have options to move the item to a different order/seat.Step 6: To tender it out to one check, you would click on PAY as you normally do.
Related Articles
Register - Pull Tabs : Check pending orders.
Article Contents: This article gives step-by-step instructions on pulling tabs by employees. Step-By-Step: Step 1: Click on the REGISTER module from the top of the screen. Step 2: Click on the TOOLS tab and click on the All Tabs/Pull Tabs button. The ...Register - Split Payment Method
Article Contents: This article will cover how a user can split a payment into different modes of payment. Step-by-Step: Step 1: From the REGISTER module (1), select a register tab to process a payment (2). Step 2: Click on the Split Pay Button. The ...Register - Splitting Tabs
Article Contents: This article provides a step-by-step guide on how to split tabs in a restaurant or bar. Step-By-Step: Step 1: Within the REGISTER module, choose the tab containing the items you wish to split from the list of available tabs. Step 2 ...Register - Checkout & Payment Processing - Food and Beverage (Video 5:11)
Article Contents: This video tutorial provides a detailed guide on how to effectively process payments, apply discounts, and manage checkout for food and beverage items using Club Caddy's register system. It further delves into the practical ...Register - Sending Orders to Kitchen/Bar
Article Contents This article contains step-by-step instructions on how to send an order to a Kitchen/Bar. Step-by-Step: Step 1: Navigate to the register and add items for the order. After adding all the items to the order, click Send. Step 2: A ...