Settings - Add or Hide Departments from Users in Role Manager
Article Contents:
This article contains step-by-step instructions on how to add or hide departments from users by utilizing the role manager.Step-By-Step:
Step 1:
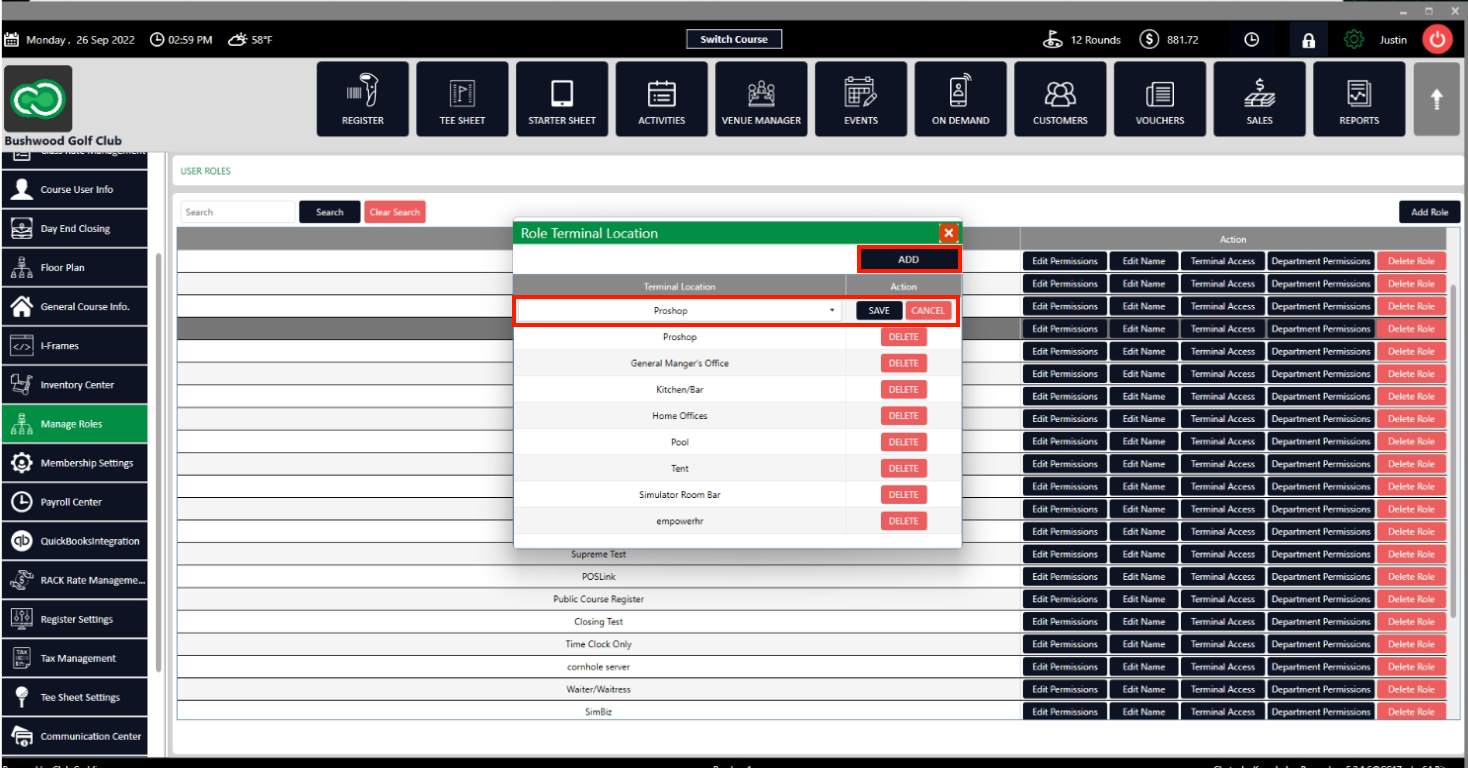
Click the Gear Wheel icon from the top right corner of the screen. Click Manage Roles from the left-hand menu.Step 2: In the USER ROLES window, a list of existing User Roles is shown. From the Action section, click the Terminal Access of that user role to hide the department. The system will generate a Role Terminal Location window.
Step 3: In the Role Terminal Location window, a list of the departments that are accessible for the user role is shown. To hide the department from the user role click DELETE. The system will hide the department for the user role.
Note:- In the Role Terminal Location window there should be a terminal location otherwise, the system won't allow moving past the load terminal screen to access the point-of-sale.
Step 4: To add department access for a user role click ADD. The system will show a drop-down of department choices, selecting one and clicking Save will allow the permission group to see that department within the register. Log out once and log back in to refresh the local permissions.

Related Articles
Settings - Add or Hide Departments from Users in Manager Roles
Article Contents: This article contains step-by-step instructions on how to add or hide departments from users by utilizing the role manager. Step-By-Step: Step 1: Click the Gear Wheel icon from the top right corner of the screen. Click Manage Roles ...Settings - Manage Roles - User Role Permissions
Article Contents: This article contains information on User Role permissions. Settings > Manage Roles > Action > Edit Permissions Step 1: Click on the Gear Wheel icon on the top right corner of the screen. Then, click on the Manage Roles button from ...Settings - Add or Hide Terminal Access from Users
Article Contents: This article contains step-by-step instructions on how to add or hide terminal access from users by using the role manager. Step-By-Step: Step 1: Click on the Gear Wheel icon from the right top corner of Club Caddie. Select Manage ...Settings – Manage Roles
Article Contents: This article contains information on managing roles by adding or removing access to actions or modules. Settings> Manage Roles> Action Step-By-Step Step 1: Click on the Gear Wheel Icon on the top right corner of the screen. Step 2: ...Settings – Course User Info
Article Contents: This article contains information on users of the courses information, how to add a new user, how to edit a user, and how to change the log of the user. Step-By-Step: Step 1: Click on the Gear Wheel Icon on the top right corner of ...