Settings - Class Rate Management
Article Contents :
This article provides step-by-step instructions on how to set up Class Rates.
 These are rates that are typically used for members. - For public rates, utilize Rack Rate Management.
Step-By-Step
These are rates that are typically used for members. - For public rates, utilize Rack Rate Management.Step 1: Click on the Gear Wheel Icon on the top right corner of the screen for Settings. Then, click on Class Rate Management on the left-hand-side menu.
Step 2 : To add a new class rate, click the "ADD" button on the right hand side of the screen. This will generate a Add Class Rate View pop-up window.
Step 3: In this window, enter all information you would like for this particular rate.
Title: The name of the rate that will be displayed.
Rate: The total cost (cart included if associated) of the rate. - Does not include tax.
Class Type: The membership Class that you want this rate applied too. Ex. You want this rate to apply to multiple Class's. For more information, click here.
Day of the Week: Which days the rate is available.
Start and End Date: Date range of when you want the rate available.
Start and End Time: The time of day that you would like the rate available.
Holes: Select 9 or 18 holes.
Display Sequence: Where this rate displays in the dropdown when selecting a rate.
Booking Window: How far out this rate can be booked.
Online Booking Window: How far out this rate can be booked online.
Occupancy (%): Normally set at 100% - Allows the user to set the point at which the class rate kicks in. If the occupancy is set to 50%, the activity would not be available until 50% of the available slots have been reserved. Setting this to 100% will allow the rate to always be available.
Maximum Usage: How many times the rate can be used. - Typically should be set to a high number. Ex. 999999
On/Off: Making this rate available.
Available Online: Making this rate available for members to select online.
When information is all entered, click Next.
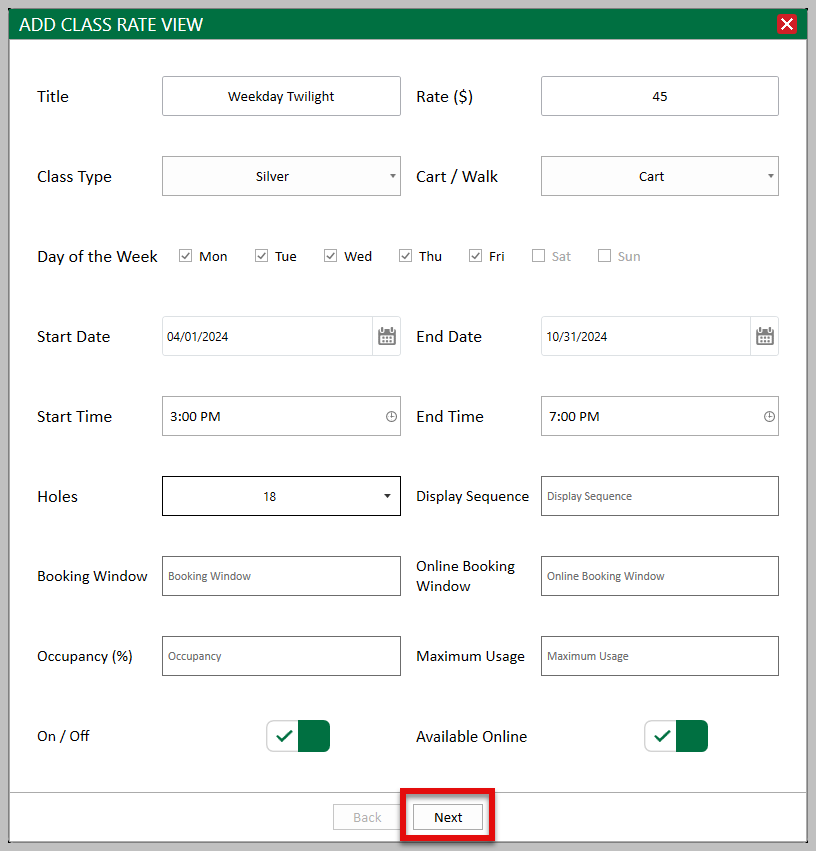
When information is all entered, click Next.
Step 4: Then, check the box Create a new Green Fee and/or Combo Item, followed by Link New Rate to Existing Green Fee Item. Your new rate should populate, then click Add.
It is suggested that the greens fee and cart fee are created in Inventory Center first.
Step 5: If the rate is Walking, then click Save. If this rate will include a cart, add a cart fee under Add Cart to Bundle, then click Add Item and Save.
If you would like to add this rate to an additional Class, select Class type on the right hand side of the screen. In the pop-up window, select the class from the drop down Membership Class.
Related Articles
Class Rate Management - Setting up Holiday Tee Time Rates
Article Contents: This article contains step-by-step instructions on setting up holiday tee time rates, which will override existing rates for the specified day, making the holiday rate the only available rate other than other holiday rates created ...Settings - Naming and Applying Class Rate to Multiple Classes
Article Contents : Class Rate Management can now give a Class Rate a “Title,” which will be what the Customer/Member sees during the booking experience. Users can now also apply multiple Classes to a given Class Rate. This is extremely helpful in the ...Settings – Class Management
Article Contents: This is a step-by-step guide on how to create a new class or edit an existing class. Step-By-Step: Step 1: Click on the Gear Wheel icon on the top-right corner of the screen. Then click on Class Management from the left-side menu. ...Settings - Rack Rate Management
Article Contents : This article provides step-by-step instructions on how to set up Rack Rates. These are rates that are typically used for customers (public rate). - For members, utilize Class Rate Management. Step-By-Step Step 1: Click on the Gear ...Guest Rates
Article Contents: This article contains a step-by-step guide on how to create specific rates for Guests. Example: Jason is a Platinum member and brings three non-members to play in his foursome, those non-members could receive a discounted guest ...