.png?width=200&height=89&name=CC%20%20fiserv.%20(3).png)
Important:
-
Cloud printing requires a compatible Star Micronics printer with an Ethernet module.
-
Auto-print does not work via Bluetooth.
-
For initial configuration only, the printer and the configuration computer must be on the exact same network (including the exact same Wi-Fi network—avoid “same name” networks split by 2G vs 5G). After setup, devices can print even if they’re on different networks (e.g., an iPad on LTE).
Printers for Cloud Printing :
Star SP700:Kitchen Printers
Star TSP143: Bar & Receipt Printers
Note: Cannot use Epson or cloud printers more than 3 years old for cloud printing. Epson printers will not allow items to be sent while using an iPad or Clover Flex.
WHEN CLOUD PRINTING MATTERS (TITLE VS TAG)
Cloud printing becomes “complicated” only when you’re doing more than one kind of printing. In Club Caddie, there are two different goals, and they are controlled differently:
GOLF / PRO SHOP PRINTING (RECEIPT-FOCUSED)
You typically want a terminal to print customer receipts and merch receipts to the correct receipt printer. This is controlled by the printer Title, because the Title is what you select under each terminal’s settings.
F&B printing (routing-focused)
You often need one order to print to multiple printers (for example, drinks to the bar and food to the kitchen). This is controlled by the printer Tag, because Tags are what you select when routing printers at the sub-department level.
THE “WHERE IT SHOWS UP” RULE:
-
Title shows in: Settings > Terminal Management > Edit Terminal > Terminal Printer (Title ties a printer to a terminal for receipts.)
-
Tag shows in: Settings > Register Settings > Department tab > Sub-department gear icon > Printer dropdown (Tag ties printing to sub-department items for routing.)

BEFORE YOU START
You will use three places during setup:
- Printer web page (Star Intelligent Network Utility)
Used to enable CloudPRNT and paste the POS URL. - Club Caddie: Settings > Register Settings > Printer tab
Used to copy the POS URL and add/edit printers (Title, Tag, MAC Address). - Club Caddie: Settings > Terminal Management
Used to assign a receipt printer to a terminal using the printer Title.
STEP-BY-STEP SETUP:
STEP 1: CONNECT THE PRINTER & LOGIN.
-
Make sure the printer is OFF.
-
Plug the printer’s power cord into a power outlet and an Ethernet cable into the Ethernet port on the back of the printer.
-
While turning the printer ON, hold down the FEED button on the front of the printer for 5 seconds.
-
The printer will print two receipts—the IP address will be at the bottom of the second receipt.
-
Open a web browser and type the IP address from the receipt into the URL field. (Google Chrome or Firefox works best.)

-
You’ll be redirected to the Star Intelligent Network Utility page.
▸ Click LOGIN under SYSTEM ACCESS.
▸ Log in with:
◦ Username: root
◦ Password: public
STEP 2: COPY THE POS URL FROM CLUB CADDIE.
-
In Club Caddie, go to Settings > Register Settings > Printer tab.
-
Click Copy URL (this is the POS URL you will paste into the printer).

-
Go back to the Star Intelligent Network Utility page and click CloudPRNT in the left-hand column.

-
Configure CloudPRNT:
▸ Set CloudPRNT Service to Enable
▸ Paste the POS URL into Server URL
▸ (Optional/default) Leave Polling time at the default (5 seconds)
▸ Click Submit
▸ If there’s a permission setting like Allow All / Accept All, set it to Accept All, then Save
STEP 3: SAVE AND RESTART THE PRINTER (FROM THE WEB PAGE).
-
In the printer web page, go to Save.
-
Choose Save > Restart device, then Execute (this restart is done from the printer’s web page, not on the physical printer).

SET UP THE PRINTER RECORD IN CLUB CADDIE
STEP 4: CONFIRM THE PRINTER APPEARS IN CLUB CADDIE (DISCOVERY).
-
Return to Settings > Register Settings > Printer tab.
-
Refresh the page.
Expected behavior:
-
If CloudPRNT is configured correctly, the printer should appear.
-
A serial number is not required (and may be populated automatically).
-
Configure Title, Tag, and MAC Address (if required by your facility’s routing setup).
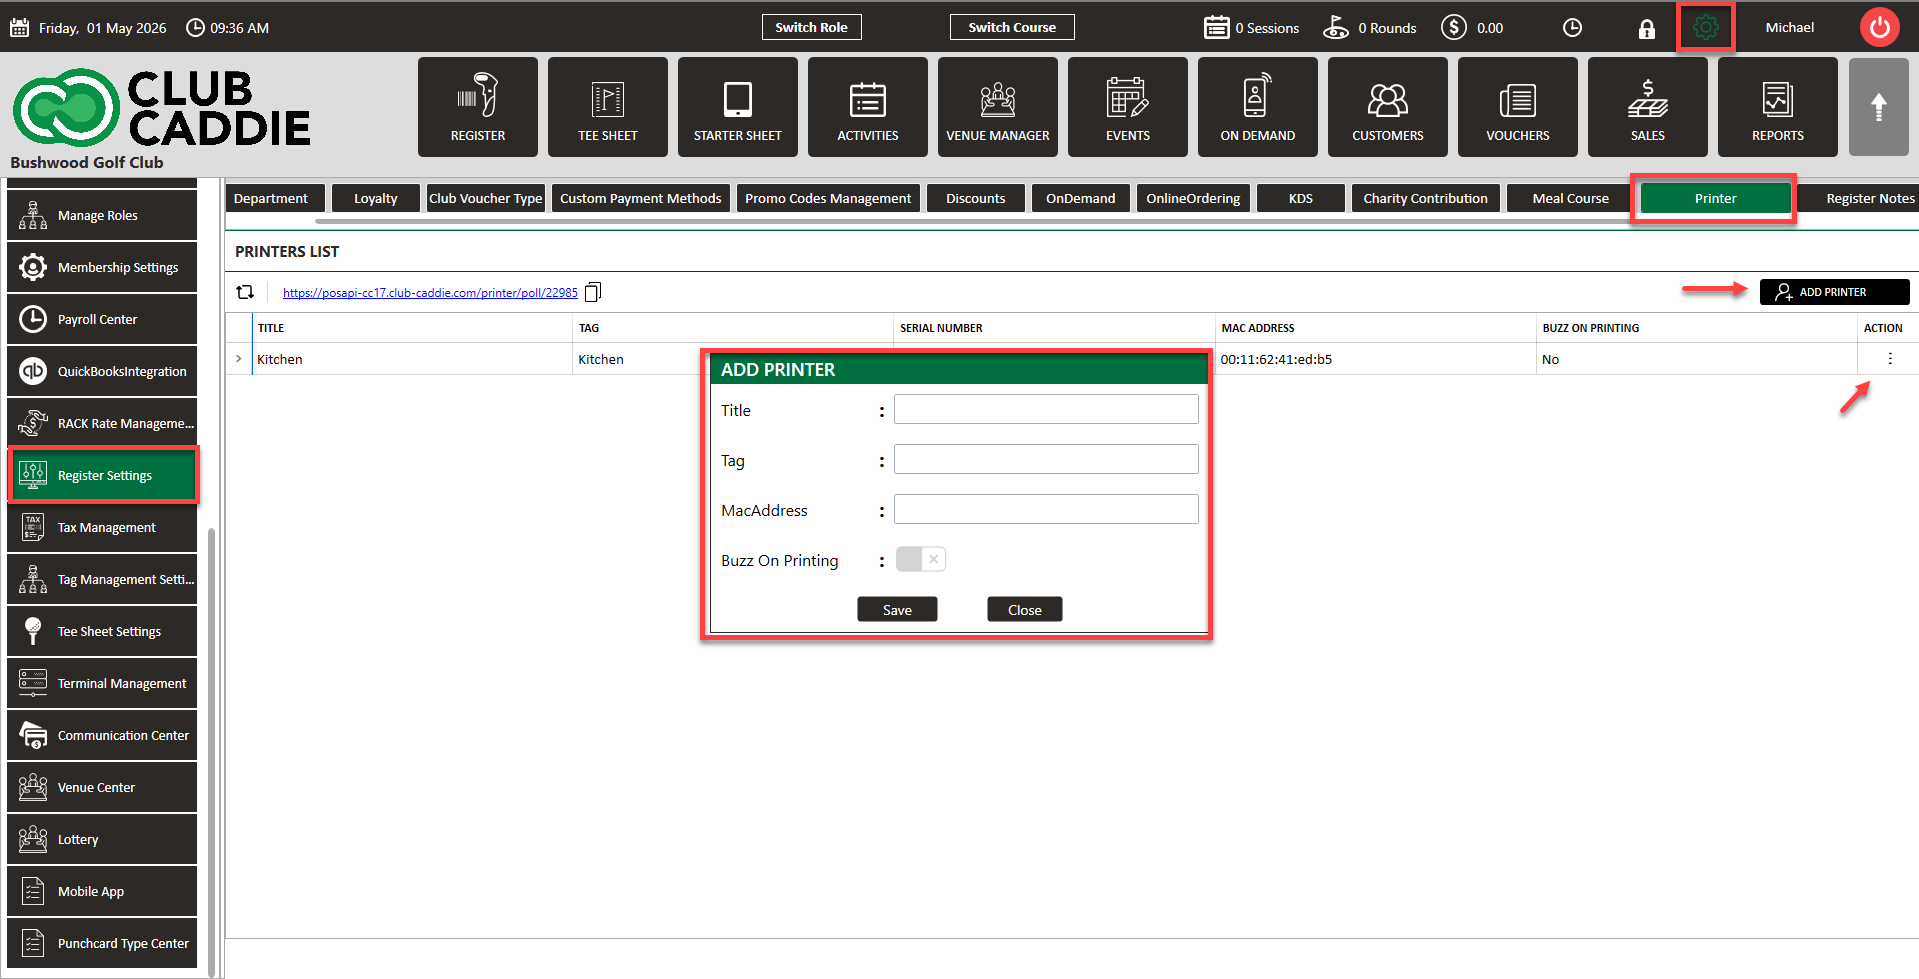
STEP 5: ADD (OR EDIT) THE PRINTER IN CLUB CADDIE.
-
Go to: Settings > Register Settings > Printer tab
-
Click Add Printer (or edit an existing printer).
-
In the Add/Edit Printer window, fill in the available fields:
▸ Title (e.g., Proshop Left Counter)
▸ Tag (e.g., Printer Bar/Drinks) -
Click the button to save the printer record.
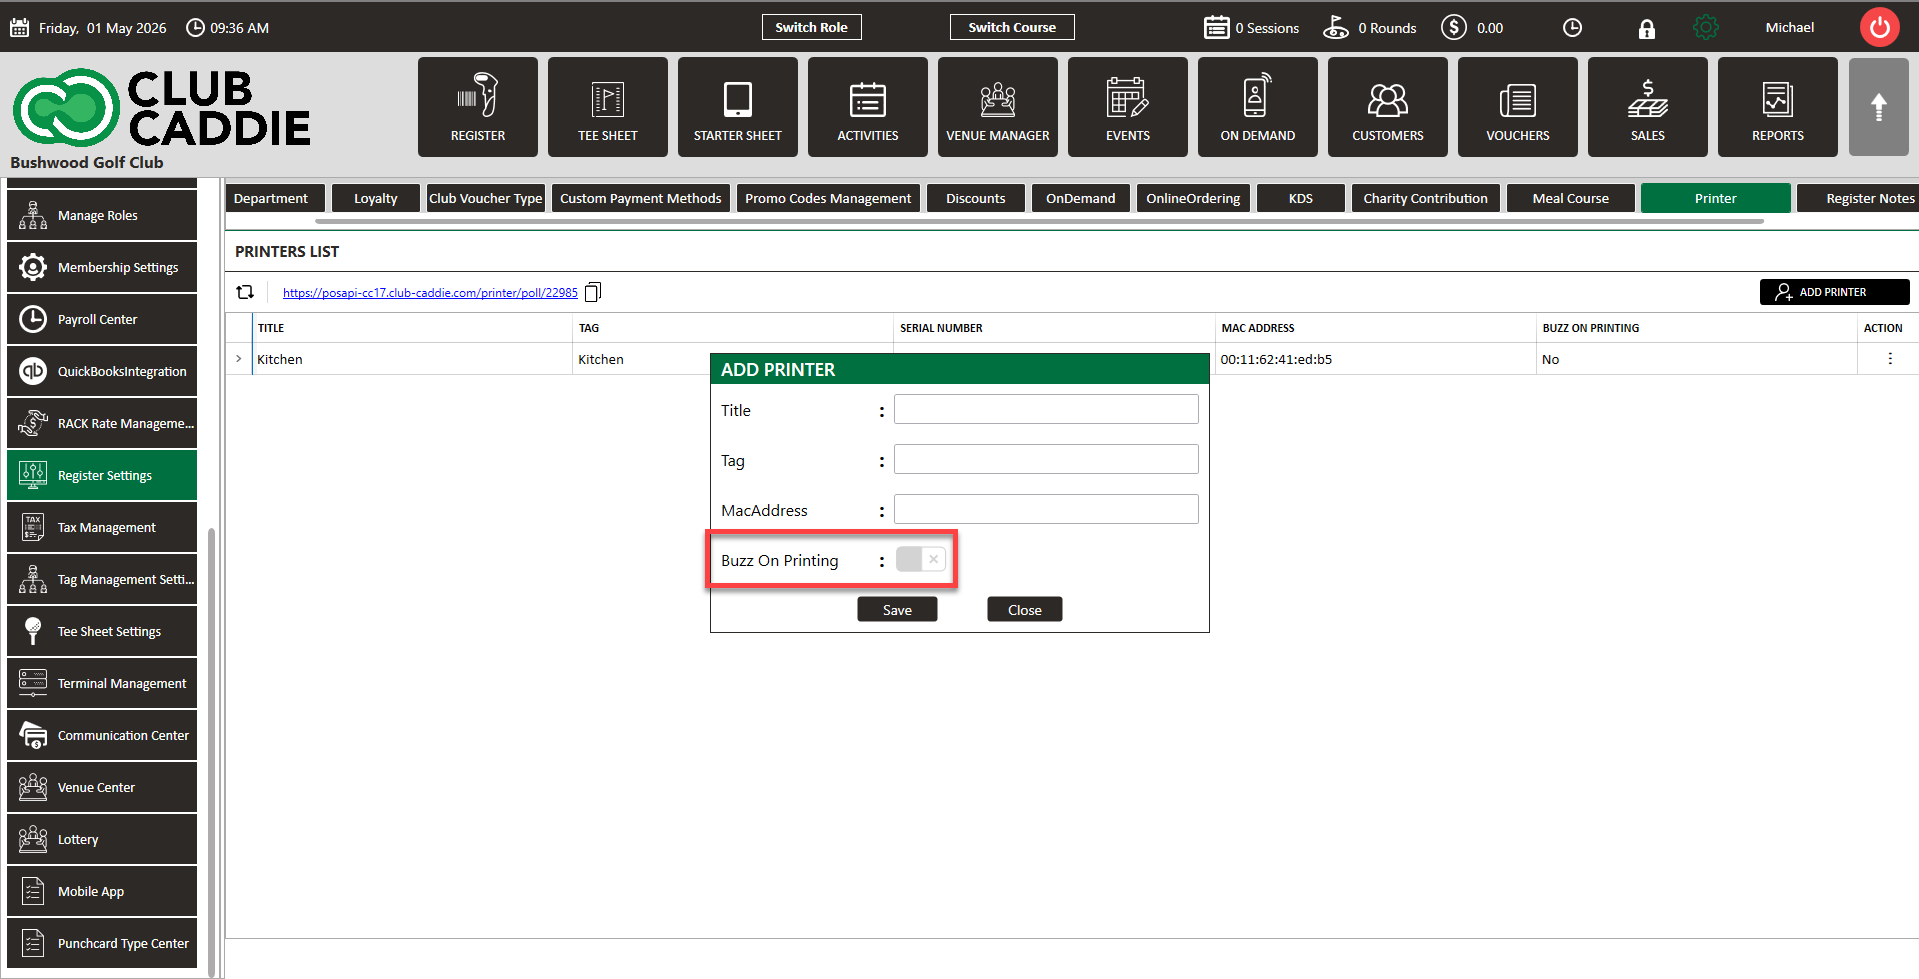
You can enable or disable the buzzer on cloud printers directly from within Club Caddie, without adjusting hardware settings manually. This is managed per printer through Settings and is useful for facilities where the buzzer is disruptive in quieter environments like a dining room or clubhouse.
HOW TO CHOOSE A TITLE (TERMINAL RECEIPTS):
Titles should be operator-friendly and describe where the receipt printer is or what it serves, for example: Pro Shop 1, Bar Left, Bar Right, Snack Bar
You will later select this Title when assigning the printer to a terminal.
HOW TO CHOOSE A TAG (ROUTING):
Tags should represent routing destinations, for example:Bar, kitchen hot, Drinks
Tags are what appear in the sub-department printer dropdown when you’re routing where items print.
ASSIGN PRINTERS FOR RECEIPTS AND ROUTING
STEP 6: ASSIGN A RECEIPT PRINTER TO A TERMINAL (TITLE-BASED).
Use this when you need a terminal to print customer/merch receipts.
-
Go to: Settings > Terminal Management
-
Edit the terminal.
-
Under Terminal Printer, select the printer using the Title you created.
-
Click Save.

Why this matters: The terminal printer dropdown is driven by Titles, so naming Titles clearly prevents confusion later.
STEP 7: ROUTE SUB-DEPARTMENT ITEMS TO PRINTERS (TAG-BASED).
Use this when you need orders to print to the correct prep areas (common in F&B).
-
Go to: Settings > Register Settings
-
Click the Department tab.
-
Under the department, locate the sub-department you want to route.
-
Click the settings gear icon for that sub-department.
-
In the Manage Sub-Department Setting popup window, find the Printer option.
-
Use the Printer dropdown to select the printer.
▸ This dropdown is populated by the printer Tag names you created (not the Titles). -
Click Save.

REAL-WORLD EXAMPLES
EXAMPLE 1 — PRO SHOP (SIMPLE RECEIPT PRINTING)
Goal: Pro Shop terminal prints customer receipts to one printer.
- Printer Title: Pro Shop 1
- Terminal setup: Settings > Terminal Management > Edit Pro Shop terminal
- Terminal Printer = Pro Shop 1
Here, routing Tags may not be the focus if you’re not sending items to prep areas.
EXAMPLE 2 — F&B (ONE ORDER → MULTIPLE PRINTERS)
Goal: Drinks print at the bar; hot food prints to the kitchen line.
- Bar printer:
- Title: “Bar Printer”
- Tag: “bar”
- Kitchen printer:
- Title: “Kitchen Printer”
- Tag: “kitchen hot”
Routing setup:
- Settings > Register Settings > Department tab
- For drink-related sub-departments, set Printer = bar (Tag)
- For hot food sub-departments, set Printer = kitchen hot (Tag)
Result: a single order can print to multiple printers because items route by sub-department printer selection (Tag-based).
EXAMPLE 3 — TWO BAR TERMINALS (WHY TITLES SHOULD BE SPECIFIC)
Goal: Two terminals behave differently:
- Bar Left prints drink tickets and customer receipts
- Bar Right prints different receipt output (such as splits or signature slips)
You would:
- Create Titles: Bar Left, Bar Right
Assign in Terminal Management:- Bar Left terminal → Terminal Printer = Bar Left
Bar Right terminal → Terminal Printer = Bar Right
- Bar Left terminal → Terminal Printer = Bar Left
Titles keep terminal receipt printing clean and predictable for staff.
KITCHEN PRINTING CHECKS (FLEX → KITCHEN PRINTER)
If you are sending orders to a kitchen printer from a Flex device:
- Confirm KDS is enabled in Register Settings
- Confirm sub-departments are configured to route to the correct printer via the Printer dropdown (Tag-based)
- Confirm Tags match the destinations you intend (example: “kitchen hot”)
-
If your facility requires MAC Address for routing consistency, ensure it is entered exactly as needed in the printer record
TROUBLESHOOTING
A) PRINTER DOES NOT APPEAR IN CLUB CADDIE
Check in order:
-
Confirm the initial setup was done with the printer and the configuration computer on the exact same network.
-
Confirm you can open the printer IP address page and log in (root / public).
-
Confirm CloudPRNT is enabled and the Server URL contains the POS URL you copied.
-
If present, set Accept All / Allow All to Accept All, then Save.
-
Restart the device from the printer web page, then refresh the Printer tab.
B) PRINTER APPEARS, BUT PRINTING/ROUTING IS WRONG
This is usually a Title vs Tag mismatch:
-
Receipt printing issue → Re-check Terminal Management and the Title assigned under Terminal Printer.
-
Routing issue (bar/kitchen) → Re-check Department tab > sub-department gear icon > Printer dropdown, and confirm the correct Tag is selected.
C) CLOUDPRNT SETTINGS/MENU DO NOT APPEAR ON THE PRINTER WEB PAGE
-
If the printer model does not support CloudPRNT, it will not work for cloud printing.