.png?width=200&height=89&name=CC%20%20fiserv.%20(3).png)
Step by step guide:
Ensure that all Gift Certificates and Discounts are properly mapped in Club Caddie and aligned with your facility’s accounting setup. Create a dedicated “Discounted Voucher” GL account and corresponding QuickBooks journal entry, and verify that these are accurately reflected in your financial reports.
For more information on where to map your items within Club Caddie, please CLICK HERE and follow steps 1-2 for more information. CLICK HERE as well for a complete over view of Journal Mapping
Step 1: Create or confirm a percentage Discount and the schedule you would like to use
a. Go to Settings → Register Settings → Discounts.
b. Click Add Discount.
c. Set Type = Percentage, name the discount (for example, “Black Friday 20%”), and set "Percent % Off".
d. Click Save.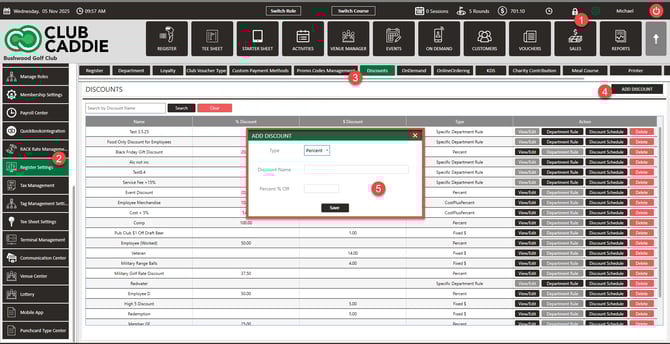
d. Set the schedule window (start/end date and time) for when the promo should be valid.
e. Save.
This is the Discounts location used by Register Settings. Promo codes currently must link to a percentage-based Discount; fixed-dollar discounts are blocked for online vouchers.
Step 2: Create a promo code and link it to the Discount
a. Go to Settings → Register Settings → Promo Codes Management.
b. Click Add Promo Code.
c. Enter the Code customers will need/type at checkout (for example, BF25).
i. Optionally add Highlight Text and Description to help staff identify the campaign.
d. Link the promo code to the percentage Discount you created in Step 1 in the dropdown Discount options.
e. Save. The promo’s validity follows the Discount’s schedule.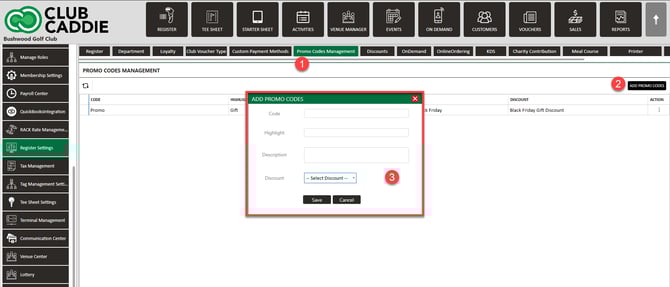
This is percentage-only for online voucher sales.
Step 3: The promo code will apply during online checkout (Gift Cards/Vouchers)
a. On your online storefront, start a gift card purchase and choose an amount (for example, $100).
b. On the payment screen, enter the promo code.
c. Confirm the total updates (for example, $100 → $80 at 20%).
d. Complete checkout. If not prepaid, the promo remains on the order and is honored at check‑in.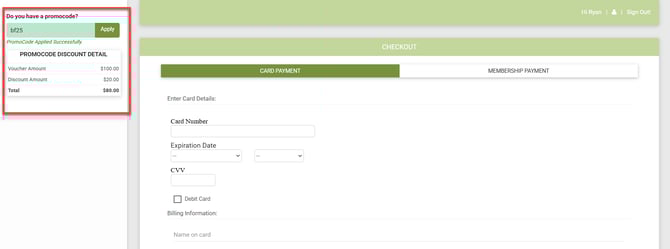
Step 4: Verify the order at check‑in (no prepayment)
a. In Club Caddie, open the order at check‑in.
b. Confirm the discounted total is still applied because the promo code is stored on the order.
c. If needed, staff can apply the corresponding Discount directly at the Register.
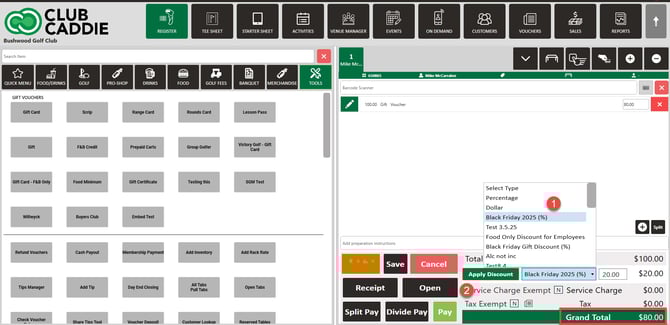
Step 5: Apply a Discount or Promo at the Register (staff action)
a. In the Register, add items to the cart.
b. Right‑click at the top of the cart and choose discount (where available) or apply the corresponding Discount from discount controls.
c. Confirm the adjusted totals and proceed to payment.
d. Receipts and Sales records reflect the discount per your receipt and GL settings
Step 6: Reporting and receipts
a. Review printed or digital receipts to confirm the promo/discount appears.
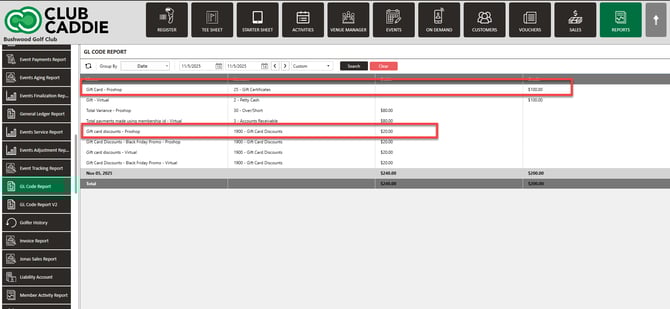
b. In Sales and GL reports, discounted voucher sales should reflect full voucher value and separate discount amounts when configured per accounting guidance.
Again, you will need to make sure that Gift Certificates and Discounts are mapped correctly in Club Caddie and for your facility. For more information on where to map your items within Club Caddie, please CLICK HERE and follow steps 1-2 for more information. CLICK HERE as well for a complete over view of Journal Mapping