Establishing a Pro-Shop Credit Account or House Account (3 Methods)
Article Contents:
This article summarizes the different methods that can be used to created a pro-shop credit account or house account depending on your facility's unique needs.
Method 1: Membership Account
Step-By-Step:
Step 1: Navigate to the CRM module within Club Caddie by clicking "Customers".
Step 2: If you already have a customer account created for your facility you can navigate to it using the search bar. If not, click on the "Add Customer" button.
Step 2: If you already have a customer account created for your facility you can navigate to it using the search bar. If not, click on the "Add Customer" button.
Step 3: In this example we will be naming the new member account "Pro Shop", and inputting both the general course email address and phone number.
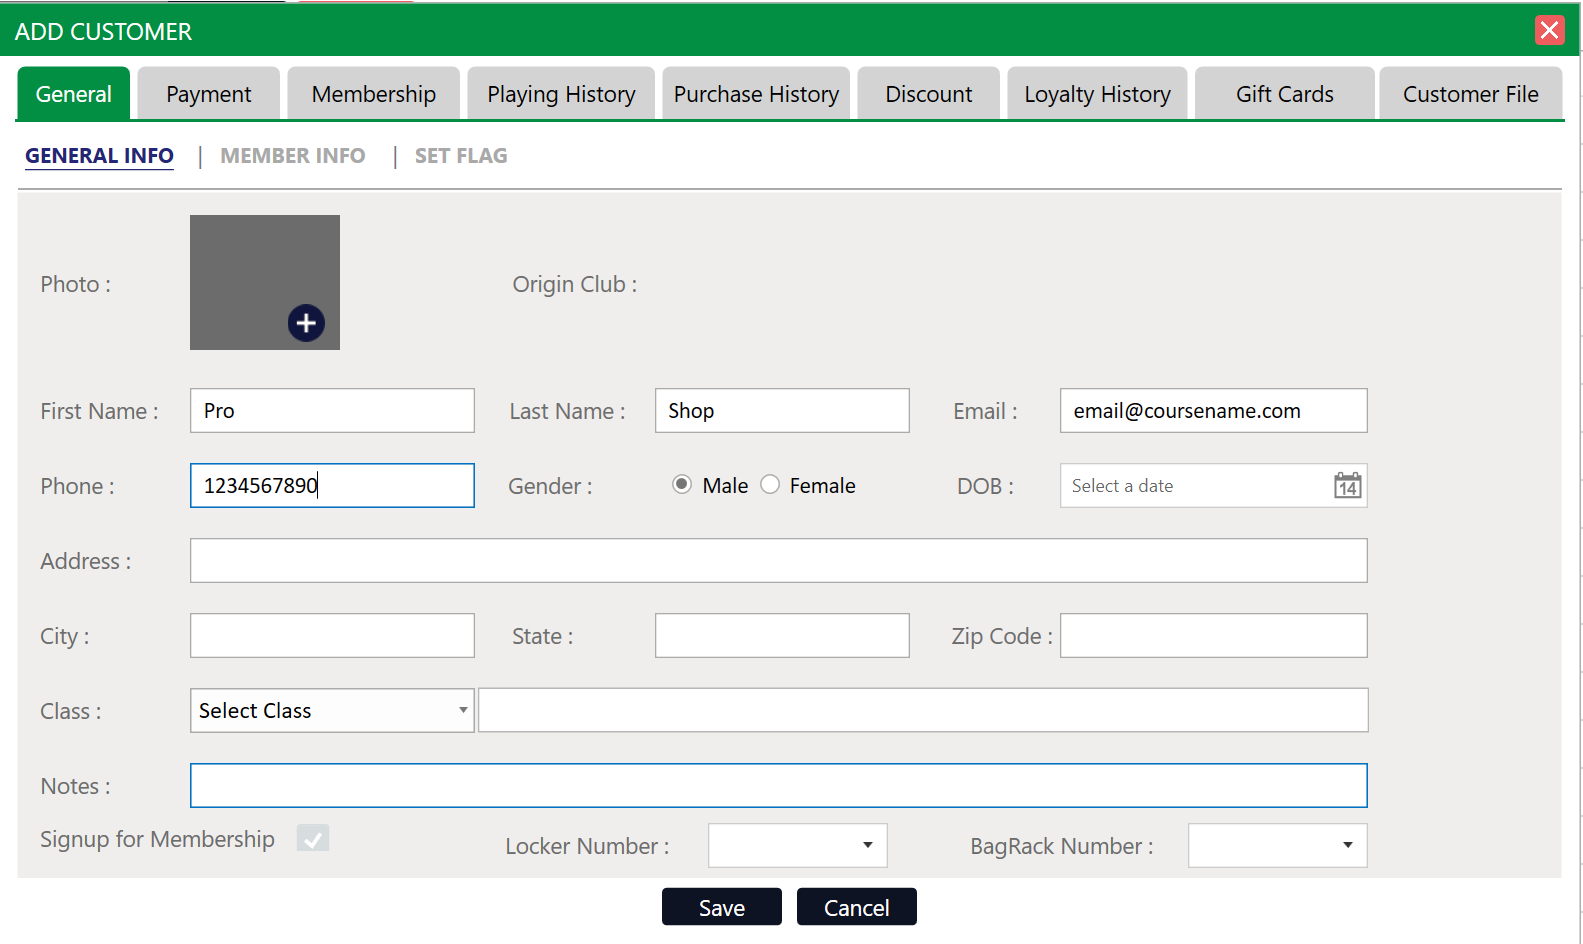
Step 4: In the bottom left-hand corner of the screen, click on the "Sign-up for Membership".
Step 4: In the bottom left-hand corner of the screen, click on the "Sign-up for Membership".
Step 5: Once successful this will navigate you to the membership info tab where you are able to either specify a custom membership ID or alternatively use the system generated ID. In this case I will name our new account "ExampleProShop".


This ID will be used when putting deposits onto the account and when charging to the account.
Step 6: Click on "Save" to finalize the account creation.
If you would like to set a charge limit to this account, you may also do so at this time by following this article.
Step 7: To make a deposit on the account which acts to pay down an outstanding balance or to assign credit you may navigate to the tools section of the register and choose "Membership Payment" - this action is covered in-depth in the corresponding article.
To make a charge against this newly created membership account, navigate to the register and to the order that you wish to charge to the membership account. Click on the pay button, and utilize the "Membership ID" payment method. You'll type in the membership ID we created earlier or search for the profile using the magnifying glass icon.
To make a charge against this newly created membership account, navigate to the register and to the order that you wish to charge to the membership account. Click on the pay button, and utilize the "Membership ID" payment method. You'll type in the membership ID we created earlier or search for the profile using the magnifying glass icon.
Method 2: Credit Book Holding Account
Creating a New Credit Book Holding Account
Step 1:
Navigate to Vouchers and select Credit Book Vouchers -> Holding Accounts -> then click Add

Step 2:
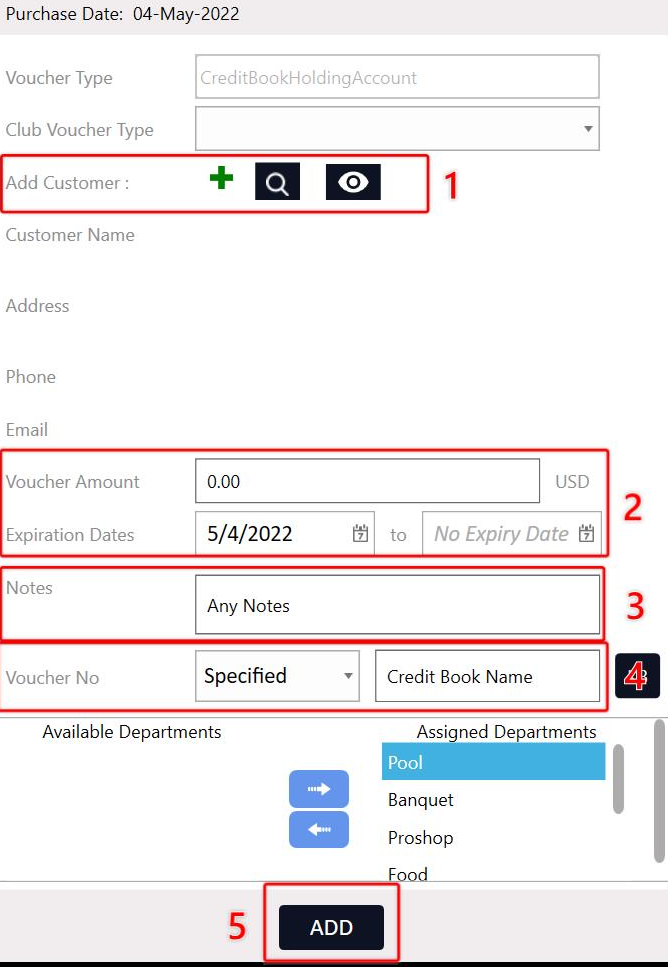
The voucher creation screen will open. In (1) you can input customer details to tie a specific voucher to a customer account, (2) You can input a starting balance and adjust the validity dates if needed, (3) Any required notes to include with the holding account, (4) To specify a custom name for the holding account you'll need to select "Specify" then input the desired holding account name, (5) select add to finalize the creation.
Navigate to Vouchers and select Credit Book Vouchers -> Holding Accounts -> then click Add
Step 2:
The voucher creation screen will open. In (1) you can input customer details to tie a specific voucher to a customer account, (2) You can input a starting balance and adjust the validity dates if needed, (3) Any required notes to include with the holding account, (4) To specify a custom name for the holding account you'll need to select "Specify" then input the desired holding account name, (5) select add to finalize the creation.
Depositing to Credit Book Holding Accounts
Step-By-Step:
Step 1: Navigate to the register module and select the "Tools" section.
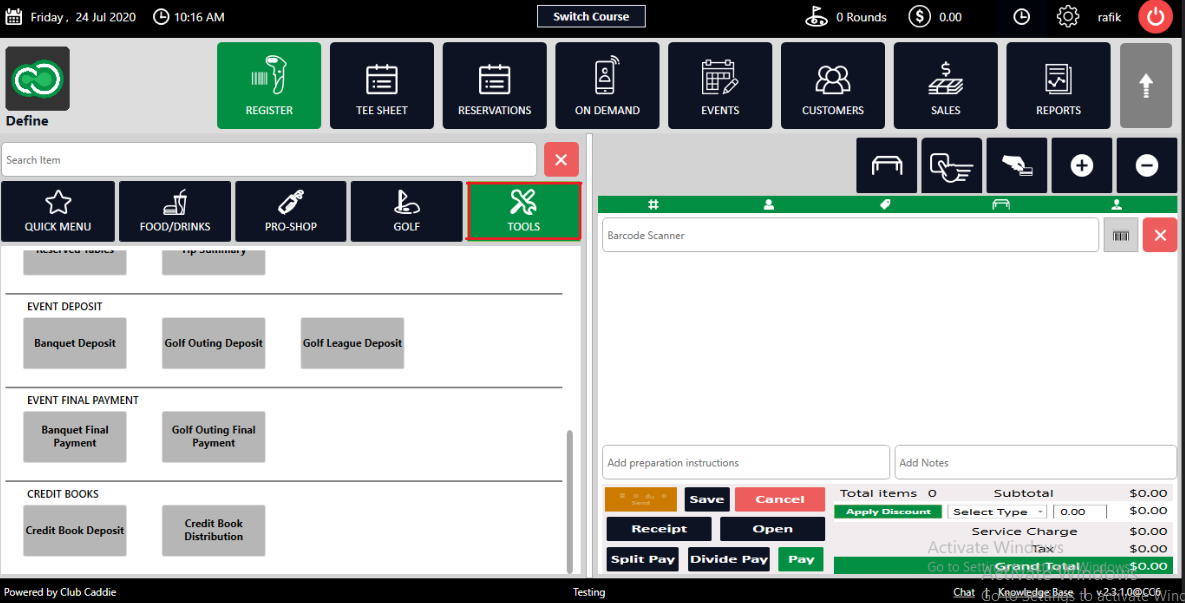
Step 2: On the right-hand side of your screen you'll find the "Credit Book Deposit" option.
Step 2: On the right-hand side of your screen you'll find the "Credit Book Deposit" option.

Note that if you do not see this option you will need to contact your course admin to enable the permission for "Voucher Manager" module and the subsequent "Credit Book Vouchers" permission.
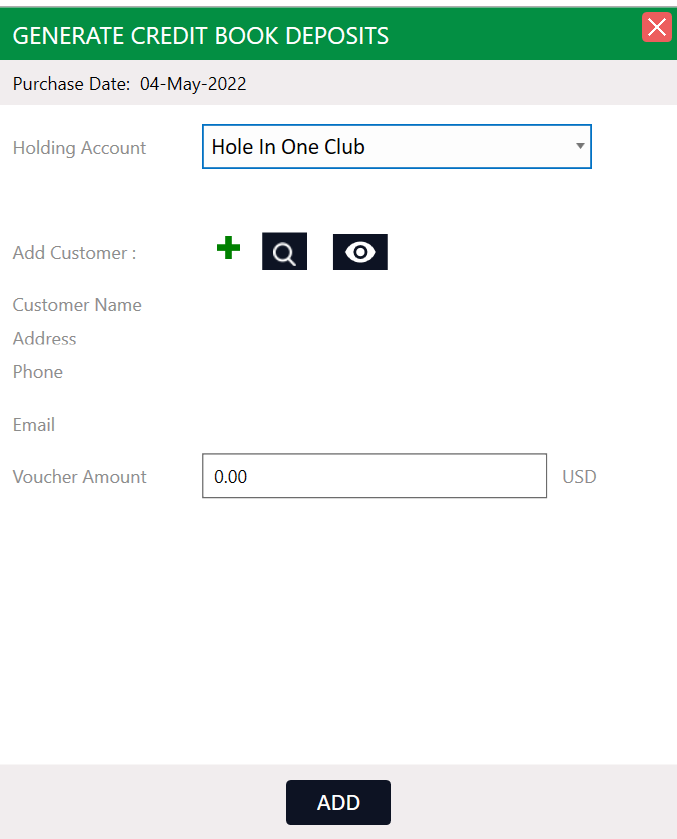
Step 3: After clicking the credit book deposit the system will require you to select the credit book holding account you'll be depositing to and the deposit amount.
Step 4:
Clicking "Add" will create a voucher deposit line item in the register and it can subsequently be rung in similar to any other transaction.
In this example below I have input a $100 deposit to the credit book holding account and can choose the pay button to accept a traditional form of payment against the order.
Note: I can edit the line item price if needed to generate a credit to the account without taking a standard form of payment, alternatively, the course is able to establish a custom form of payment to record a credit generated.
Step 5: To check the balance, usage history, or make additional edits to our newly created holding account we can navigate to the "Voucher Manager" module found in the top navigation bar. Next, select "Credit Book Vouchers" on the left-hand side and "Holding Account" in the top navigation bar.
All holding accounts will be displayed here alongside the option to view its usage history and drill into the orders affecting the holding account's ledger.

All holding accounts will be displayed here alongside the option to view its usage history and drill into the orders affecting the holding account's ledger.
Distributing from a Credit Book Holding Account
Step 1: In order to pay out the holding account balance into vouchers that can be distributed to customers we can navigate back to the "Tools" section of the register and choose the "Credit Book Distribution".
Step 2: This will launch the Credit Book Distribution manager. In the top left-hand corner you can specify the number of new vouchers we will be creating.
A) If desired the user can use the "+" icon to create a new customer profile or search for the customer using the magnifying glass icon.
B) Under the voucher number column you can specify a custom voucher number or alternatively swipe a hard gift card number.
C) The validity start date is automatically set to today, you can adjust this date if you wish for this voucher to be available at a later time.
D) If desired you are able to specify a voucher expiration date in the "Expiration Date" column.
E) If desired you can leave a note record against each of the created vouchers.
In the example below, I'll be distributing the $100 we deposited earlier into five new vouchers at $20 each. I specified a customer on the first voucher but left the remaining vouchers as anonymous.
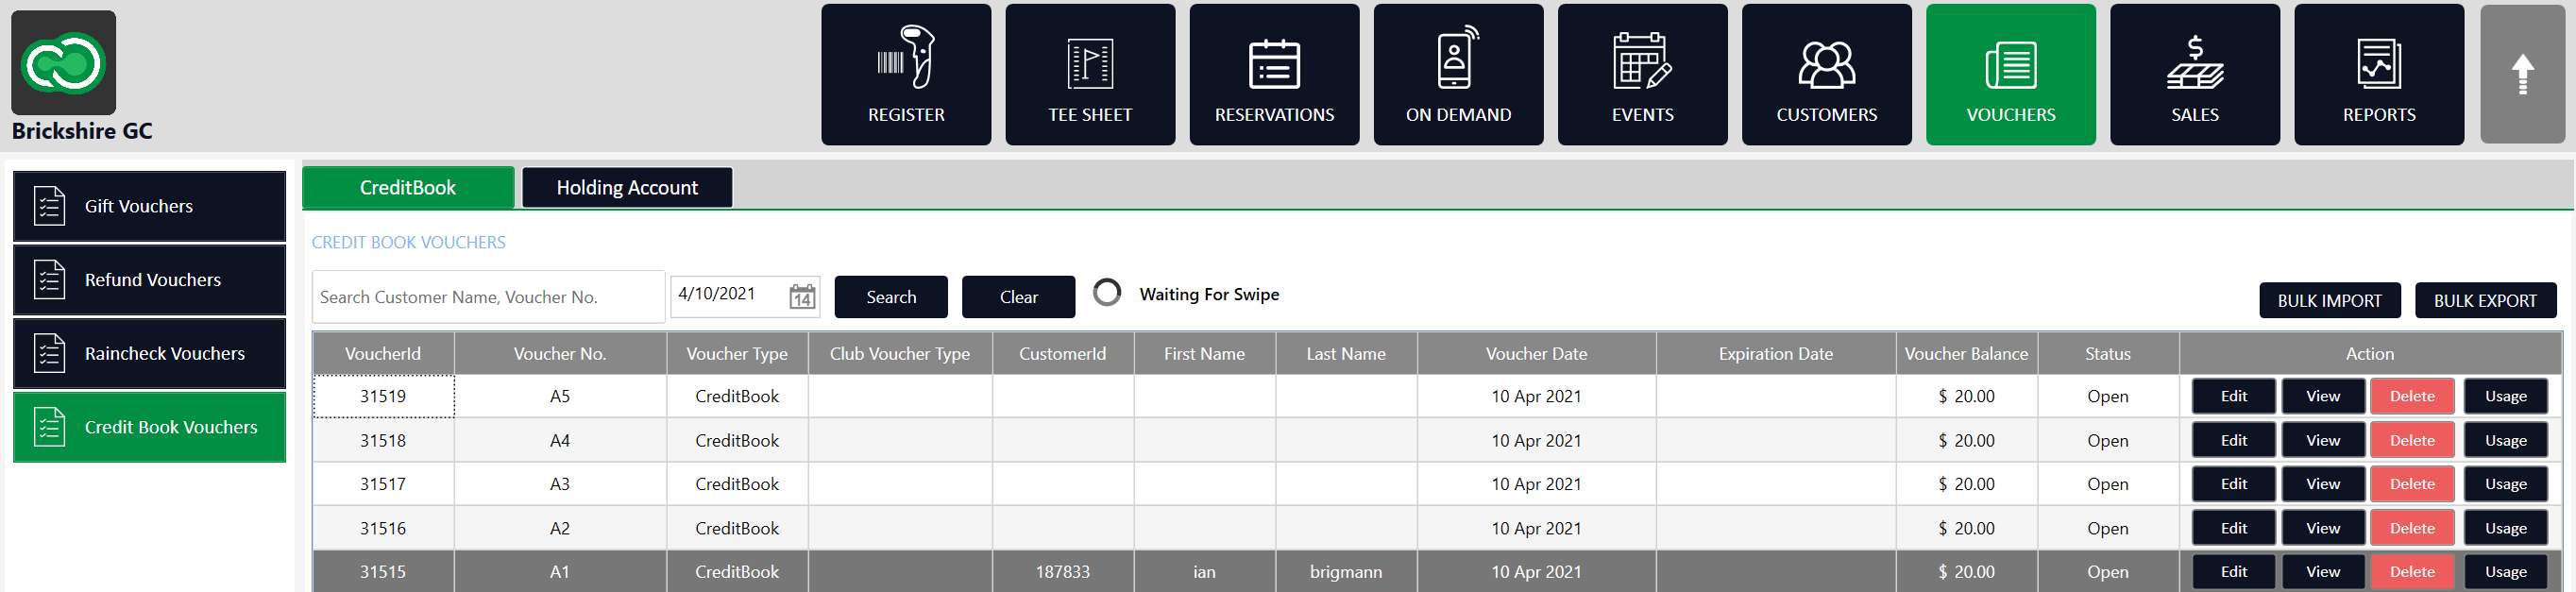
Step 3: After hitting "Pay", you are able to find the newly created vouchers under the "Vouchers" module, then clicking "Credit Book Vouchers" and then "Credit Books".
In our example below, you'll find the credit vouchers we created in the step above. Additionally, we have the options to edit/view and print voucher information as well as delete or view the details voucher usage.
In our example below, you'll find the credit vouchers we created in the step above. Additionally, we have the options to edit/view and print voucher information as well as delete or view the details voucher usage.
Method 3: Creation of a Custom Payment Method
Step-By-Step:
Step 1: One alternative method available is to create a custom payment method available to users through the register as a payment option. Note that this will function similarly to the cash operation within the system.
Step 2: Navigate to "Settings" by clicking the gear icon in the top right-hand corner of your screen. On the left-hand menu select "Register Settings", then from the top navigation bar click on "Custom Payment Methods".
Step 3: Using the "Add" button in the top-right will create a new payment method record. You'll be asked to specify both the name and the account within your chart of accounts that the payment method will route income to. When you have finished specifying these field click on the "Save" button on the far right-hand side of the new record.
In the example below, we'll create the option "House Account" and route it for simplicity to our loss account.
Step 4: This new record will now be a selectable option during the payment operation for users. Additionally, it will be displayed in the appropriate reporting and sales history filters to give you visibility into its usage.
Related Articles
Managing Clover Payment Processor Outages with Club Caddie
Article Contents: During a Clover payment processor outage, it's crucial to have alternative solutions to ensure uninterrupted service. This article provides steps for operators using Club Caddie to manage such situations effectively. Step-By-Step: ...Trouble Shooting: Class Rates not Populating on Tee Sheet
Article Contents: This article provides step by step instructions on to trouble shoot when a class rate is not populating on the tee sheet for a member. Step-by-step: Step 1: Check the members profile under the Member Info tab that their class is ...How To Login To Club Caddie (Video)
Article Contents: This video tutorial provides a step-by-step guide on logging in and clocking in using the Club Caddy software for food and beverage operations. Step-By-Step: Step 1: Navigating to the Club Caddie login screen and selecting the ...Moving an Email Address from an Archived Customer Profile to a New Profile
Article Contents: This article contains a step-by-step guide on how to move an email address from an archived customer profile to a newly created profile. This process is crucial in situations where a customer requires a new profile or needs to ...Downloading Club Caddie
Article Contents: We'll walk through step-by-step how to download and log in to your facility's golf management platform. Step-By-Step: Step 1: Depending on your user type you'll want to select the appropriate link from the following: A) If you are ...